Standard manual - English Version
Содержание
- 1 Overview
- 2 Documentation
- 2.1 The client area
- 2.2 Catalog
- 2.3 Manager area
- 2.4 The administrative part – cms mPanel
Overview
Scope
This document provides documentation for the management and use of the demo site Auto.MstarProject, a detailed description can be found at http:// www.mstarproject.com/en/?action=tecdoc_mysql_site.
Due to the fact that our modules are constantly being improved and modified, it was decided to keep this document on the wiki while preserving history and other advantages of versioned documents. It is possible that the site is different from the written documentation to it - this means that the documentation page will soon be updated after finishing the project, which implemented this updated version of the module.
Goals
Since we have specialization and many successful projects in the auto portfolio, we get a lot of questions about how our sites work. We have put all these sample questions and information in a single location within the project documentation Auto.MstarProject.
Documentation on the demo site - it's a step forward for customers who want to buy the site, knowing that it will be and how the site will work after completion.
Version of Standard package
The current version of the documentation and standard package - 4.6.4. Version of the current site is displayed in the closed cms mpanel - at the top of the form {$ ProjectName} MPanel v {$ CurrentVersion}. An example for this demo project - Auto.Mstarproject - MPanel v4.6.4
More information about releases of software and changes to, can be found on a separate page http://manual.mstarproject.com/index.php/Auto.Mstarproject_-_Release_notes
Documentation
The client area
Module registration and profile
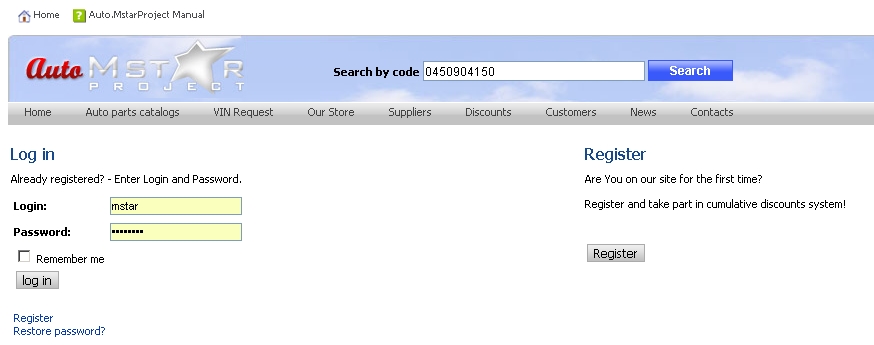
The module includes a total login page and registration, where all users are redirected in a situation when you need authorization or encounter any bugs with login:
registration form new client includes a minimum set of mandatory fields for registration and verification of employment AJAX login box "password complexity" and math captcha:
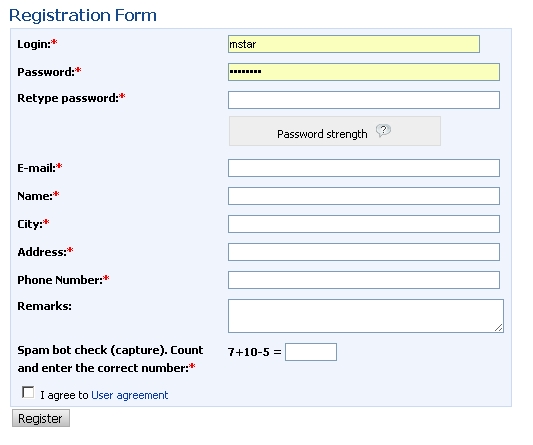
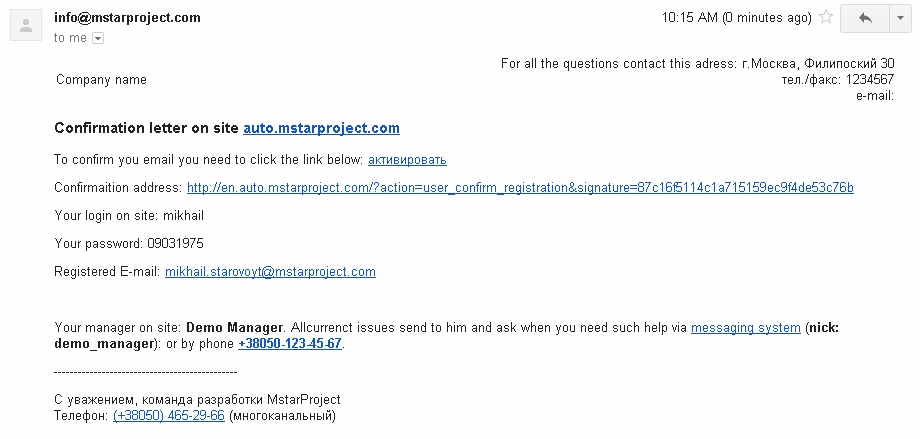
In the event that the customer filled out the form incorrectly or missed any required fields - it will print an error stating that you need to fix. If the form is filled in correctly - automatically once the customer logs in to the site and into your account. The mail is sent to the customer such notice:
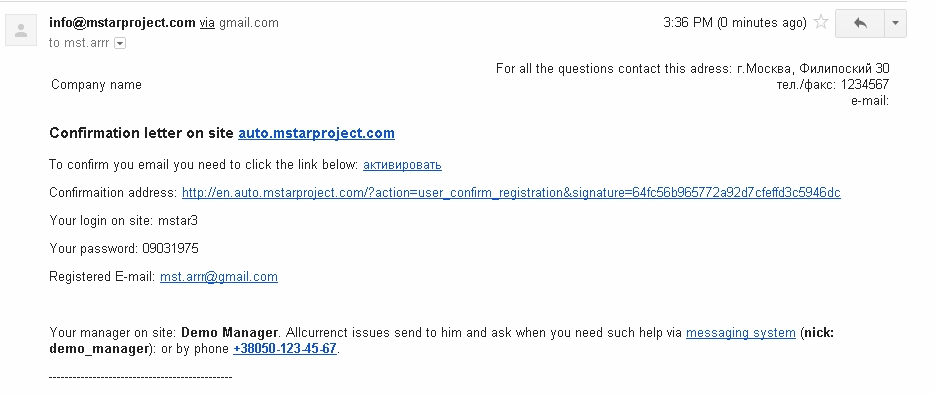
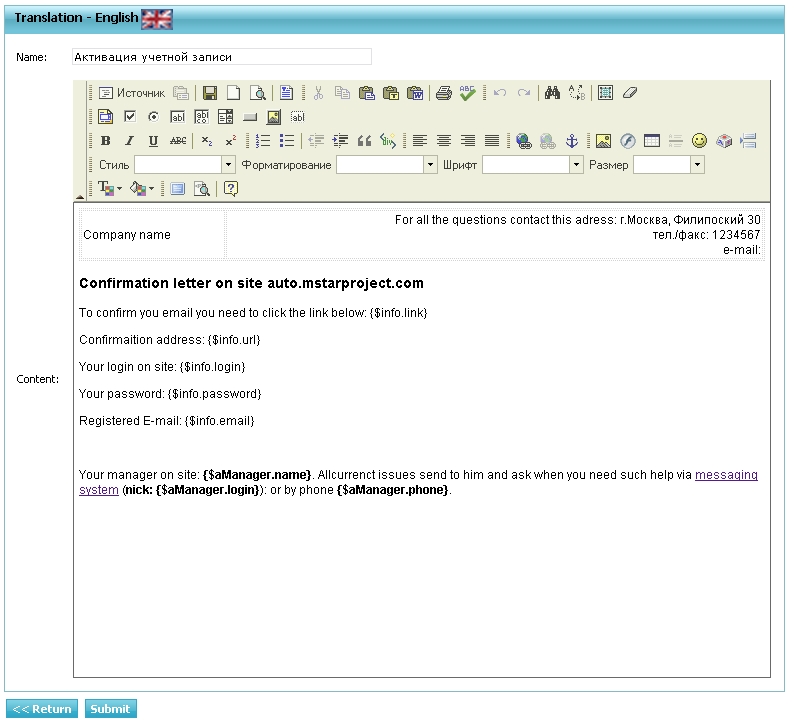
A copy of this notification is stored in the template code confirmation_letter. You have to edit it in a module >> Content> Templates mPanel, substituting the data of the company. More information on how to use templates in mPanel described in the module Template Manager.
All completed client card can be found, edited, but not delete - to delete a user site, you need to make it "invisible":
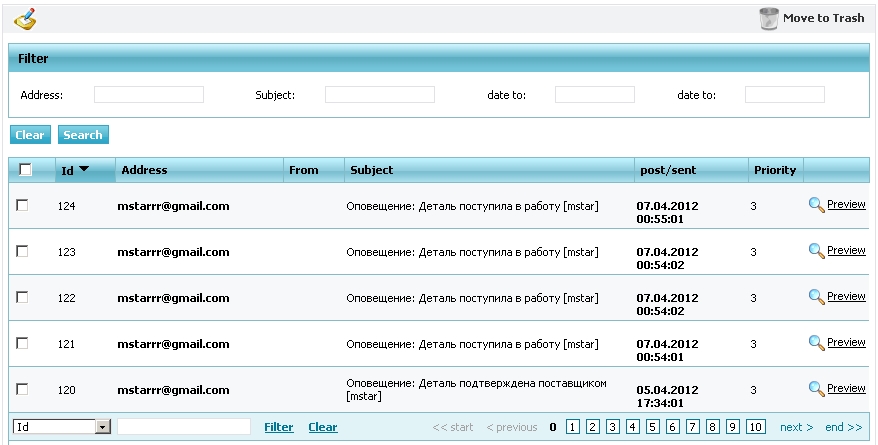
mPanel>> Users> Customer
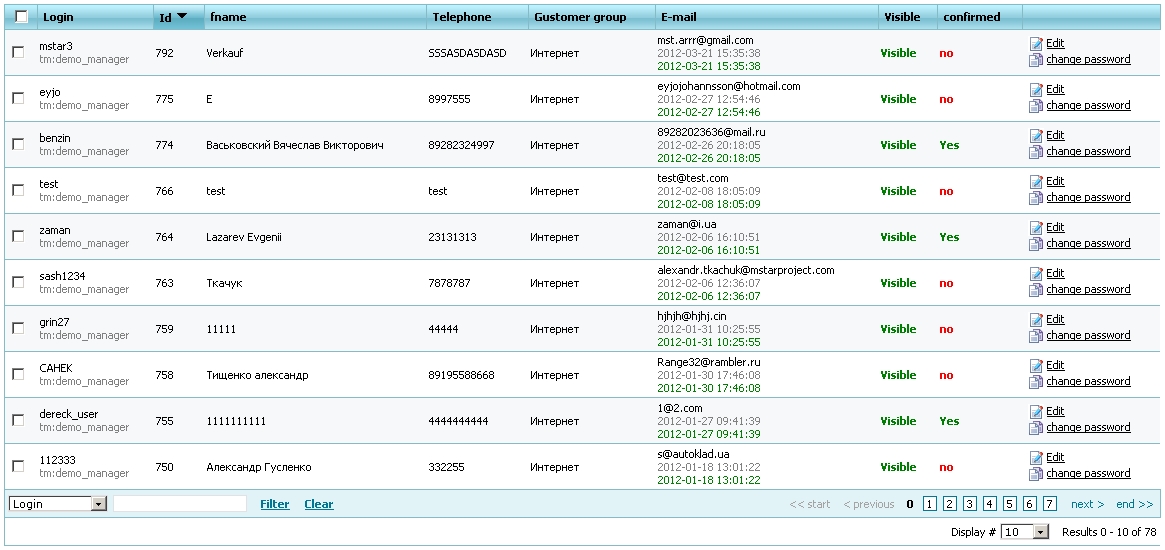
To test the operation of the site even when the project is in working order - you can create a "test" customer and after testing is complete "Clear the test data."
Profile
Your data and settings, the user can edit his own in Profile:
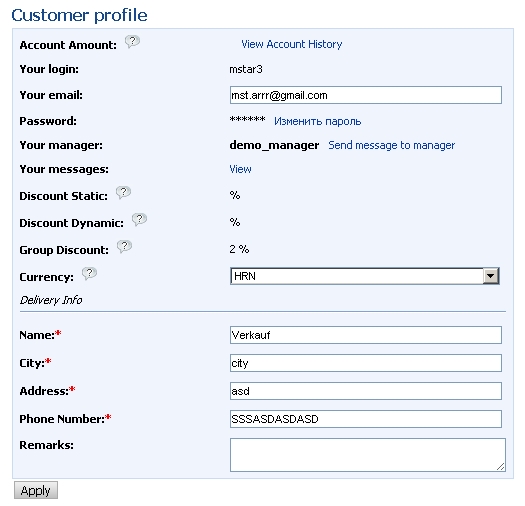
In addition, the customer can register himself through the registration form - it can create VIN requests, make an order without registering or VIN for a customer request may issue the manager. In such cases, creating the so-called "Temporary" account, for example login a62392 (password: d39102). That the customer was able to use that account - you need to replace a temporary to permanent login and password can be left unchanged.
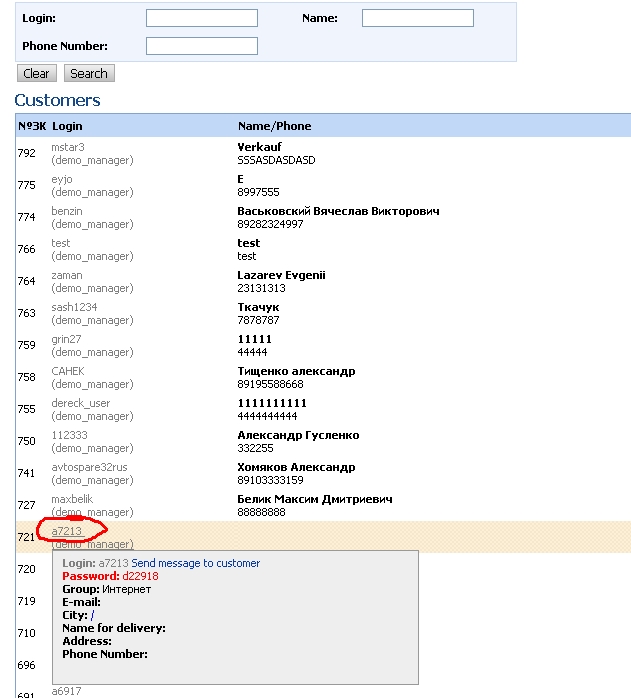
The password for the temporary account is displayed in clear text in the summary card of the client and mPanel, for all other users password is encrypted and can only be changed or a new form through password or in mPanel site administrator.
Dashboard
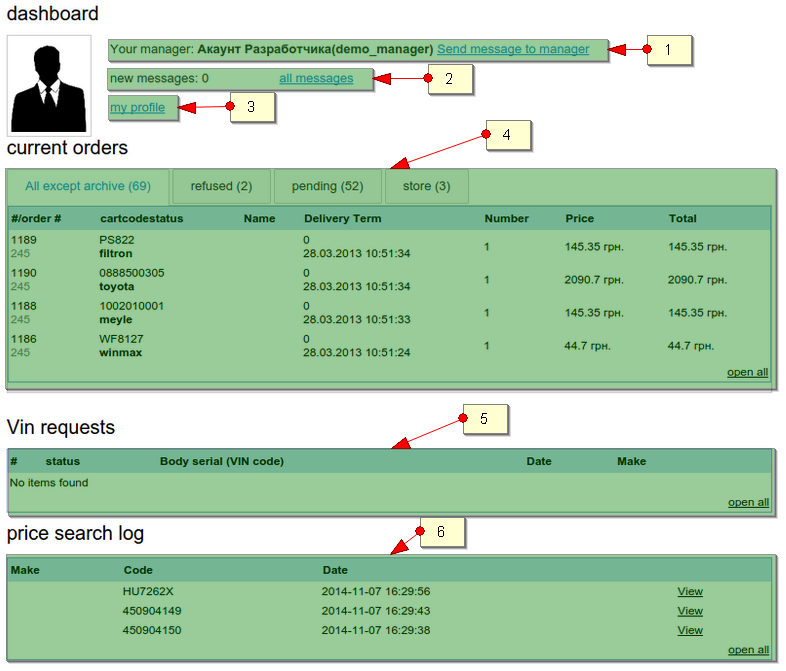
Your accountis a page for fast view and access to frequently requested information, such as: orders, vin-requests, messages, search requests.
- Name of the manager assigned to current user. Link “write message to him”transfers to new message page where manager’s login was already entered to address field.
- Information about quantity of new messages and link to message page.
- Link to user’s profile
- Succinct information about orders’ details |"orders in work"
- Recant VIN requests
- Recant search requests
Order Management and basket
The module consists of the following parts:
- Cart items, which is Customer's shopping cart
- Ordering in a few steps, providing details on each step.
- Orders in work - for tracking (status) of the ordered items.
Duration of the basket
Customer puts items to the basket and he can make the order by them.
In case customer left details without order they are kept there till certain moment.
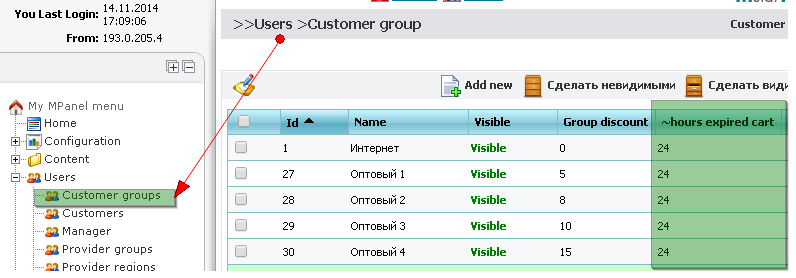
This task is solved by parameter "Number of hours for removal items from the basket".
During the registration to every customer will be assigned certain group
That is fixed to this parameter.
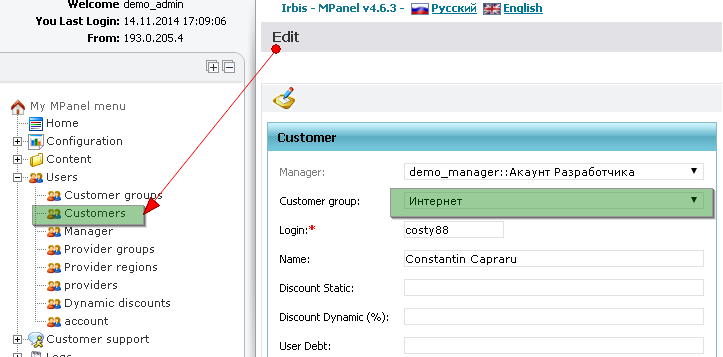
Manager can view and change customer’s group in Empanel
Groups’list and parameter’s value fixed to them - " Number of hours for removal items from the basket "
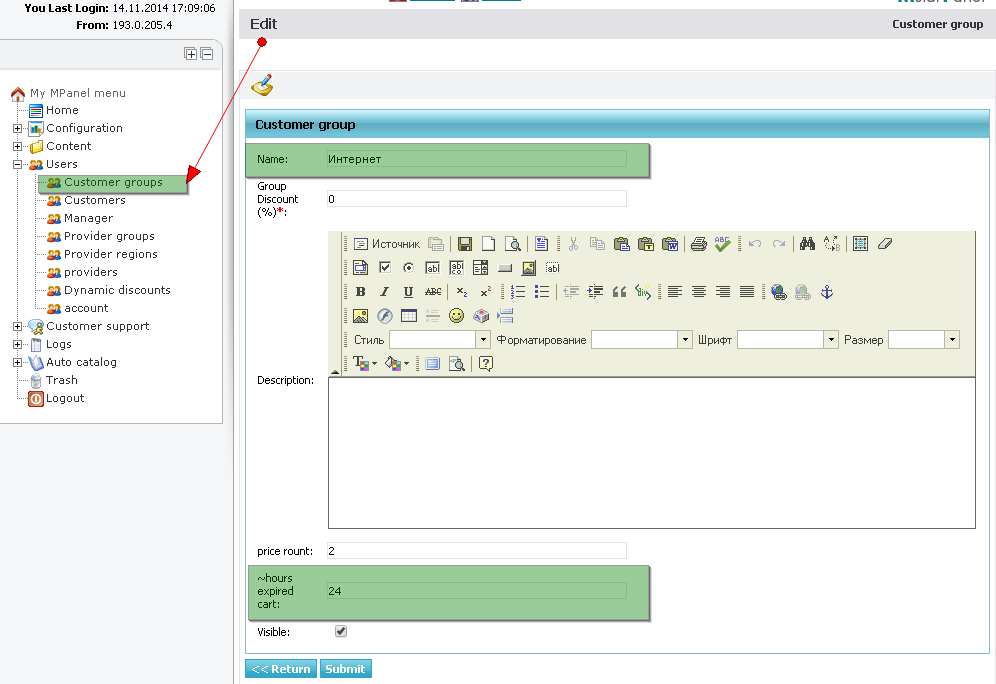
Example of editing customer group:
There 2 variables in constants:
hours_expired_cart – if value of user’s group is not field = 0, it will be taken from this constant.
hours_expired_cart_delete – removed items will be kept so many hours until they disappear completely.

In case customer left data in the basket and they were moved to removed but were not deleted from removed
On reference to basket a message with the link to removed items will appear.
 Файл:AT609-5 en.png
Page with removed items:
 Файл:AT609-4 en.png
Search by part number using the crosses
Designed to search for parts of a given code. To find a needed part number you need to search form
enter the desired code. System will pick up spare parts found in an exact match code and crosses of this code.
If the required code to be found more than one brand, it will display a table containing the found brands and links to search through the code, taking into account the chosen brand.
The financial module user
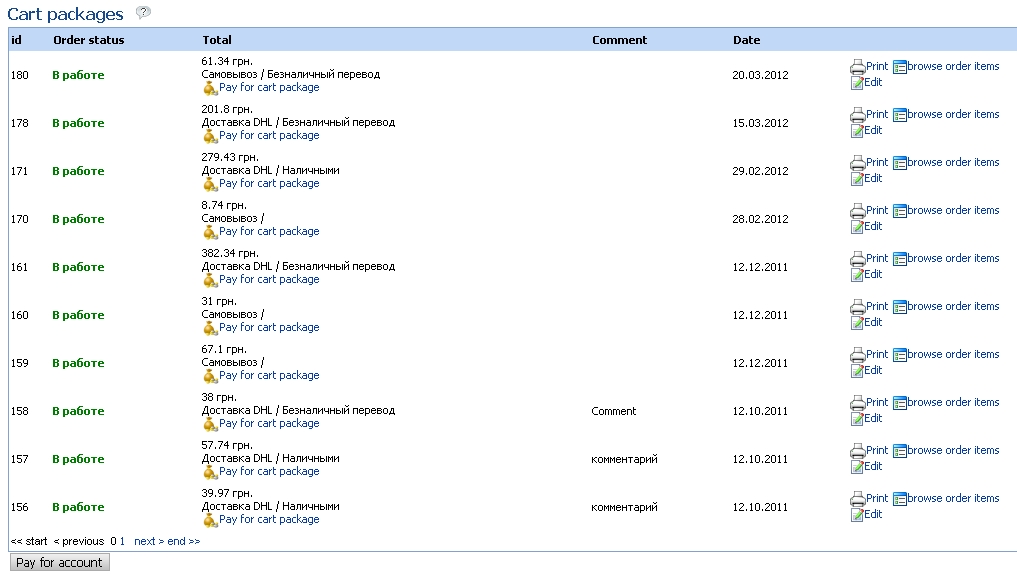
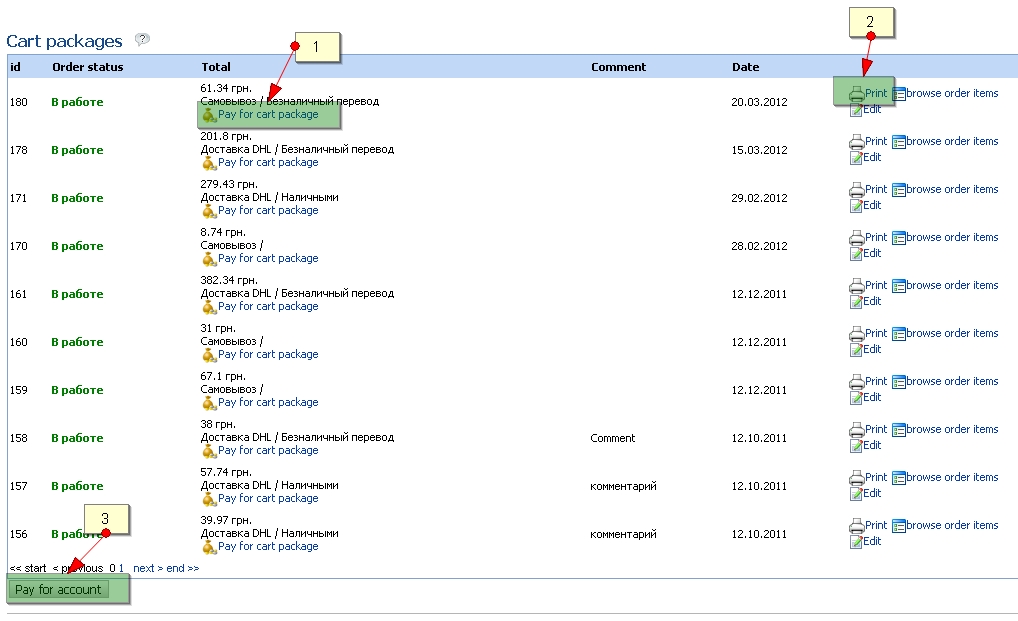
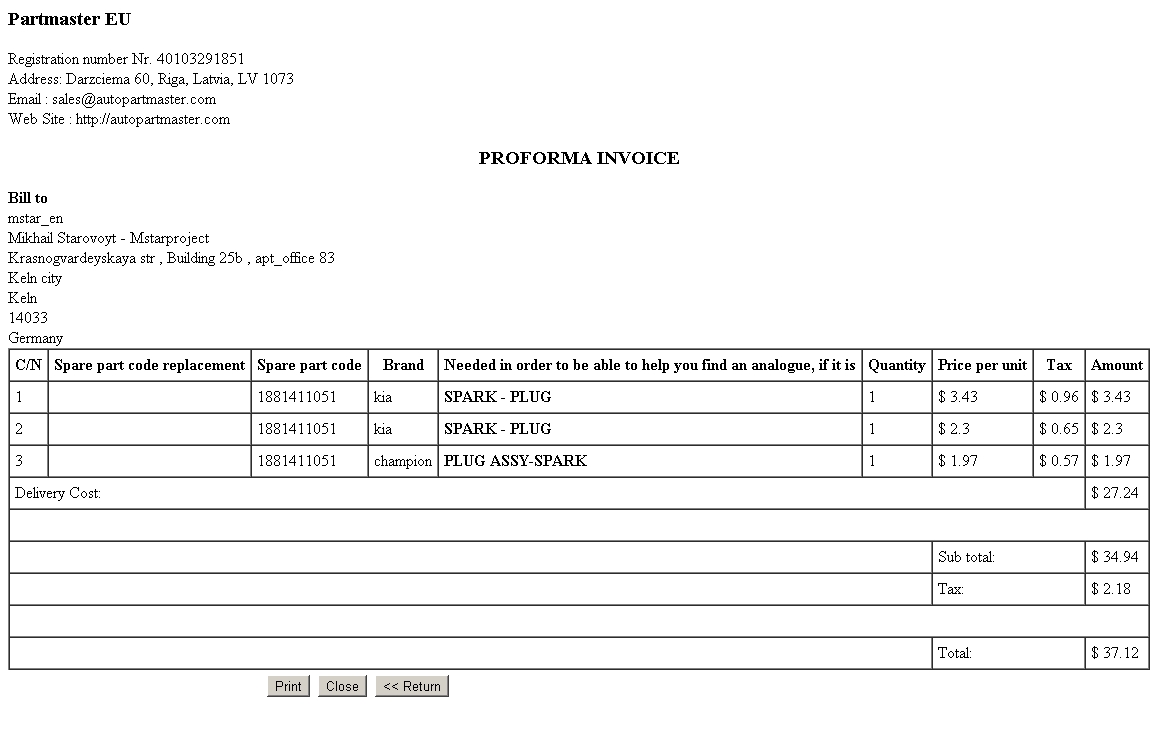
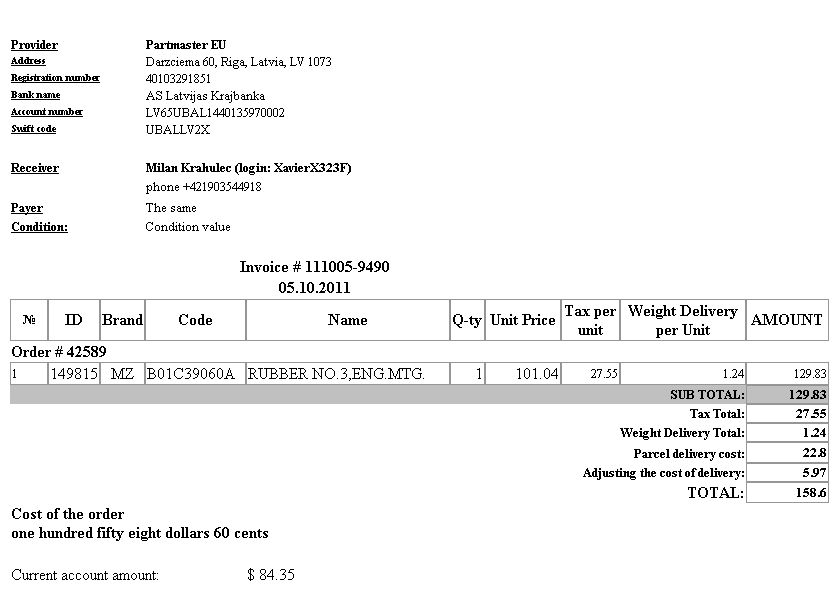
The customer has the opportunity to pay the order immediately at registration or the same page Orders:
- [1] Receipt for wire transfer to retail customers - with the selected method of payment, "Non-cash translation"
- [2] Invoice on request for non-cash payment wholesalers
- [3] the payment page with descriptions of all available payment methods on the site, edited the module mPanel>> Content> Page Editor
Examples of non-cash receipts and accounts for the order:
You can change and edit the list of available methods of payment do you module
mPanel>> Content> Payment types
Field "Description" and "Description of the last step" of each type of payment - this is the text displayed respectively on the penultimate and last step of placing the order by the user.
You can change and edit the list of available details of accounts for which payment is made:
mPanel>> Users> Account
If the score is "Visible" - it will be available in the drop-down list for details of payment. "Is Active" account, which can be only one in the system - will be substituted in order to press accounts, and wherever there is no choice of details, and to substitute "account by default."
The module Customer bills are collected by the account and pay-in slip of the customer. In the manager part of this module, except printing invoices is also possible to create a "credit cash order" for cash.
The constant "print_content: autoprint" is responsible for the fact that the document will be automatically sent to the printer without viewing before. Otherwise it will be shown before the show with "Print" button "Close" and "Return" at the bottom of the document.
Vin requests module
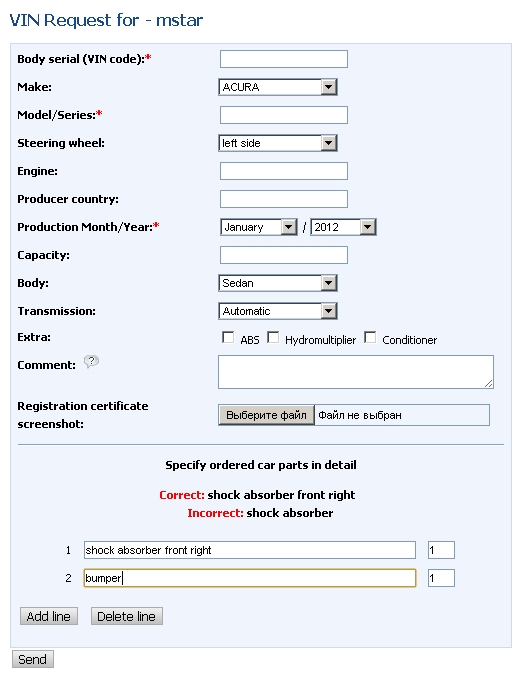
The Vin requests module is in both the manager and the customer area, including not a registered user (guest). Customer (guest) of the module consists of:
This form can be from any of the guest or registered customer. Instructional text to the right of the query form is edited in the "Text Translate" code "vin_request_add_right". The description text after sending the request to the module ">> mPanel>> Content> Templates" - "unregistered_vin_request".
- The table their requests http://en.auto.mstarproject.com/?action=vin_request
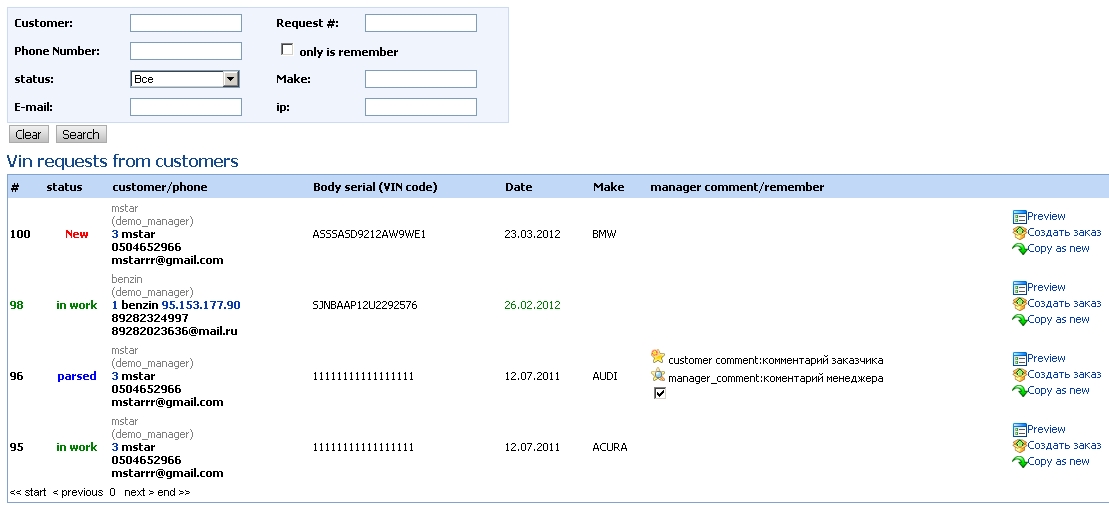
Manager part of the module
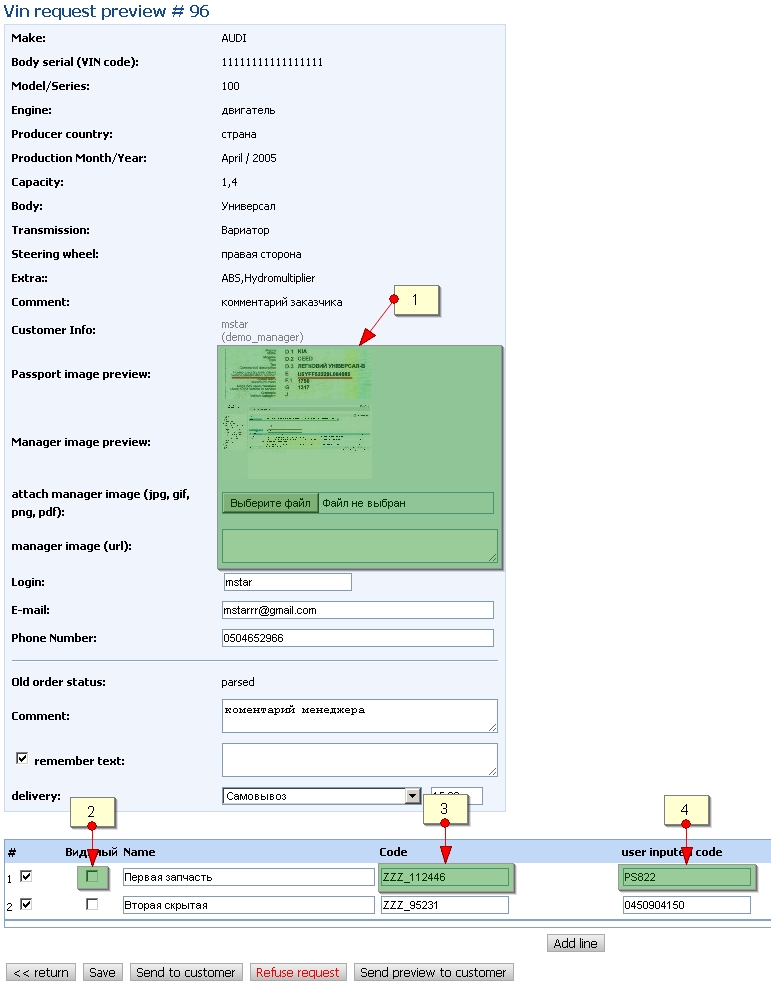
- Form of request processing
- [1] The customer can make a screenshot or pdf file, for example, the specification of your machine. A manager can make in response to the same file.
- [2] Checkbox, showing a client a real, not "hidden" internal code in the request and notification.
- [3] These are inserted into the manager selected codes, which are then converted into the hidden system codes.
- [4] The code is saved for the manager to re-do the selection.
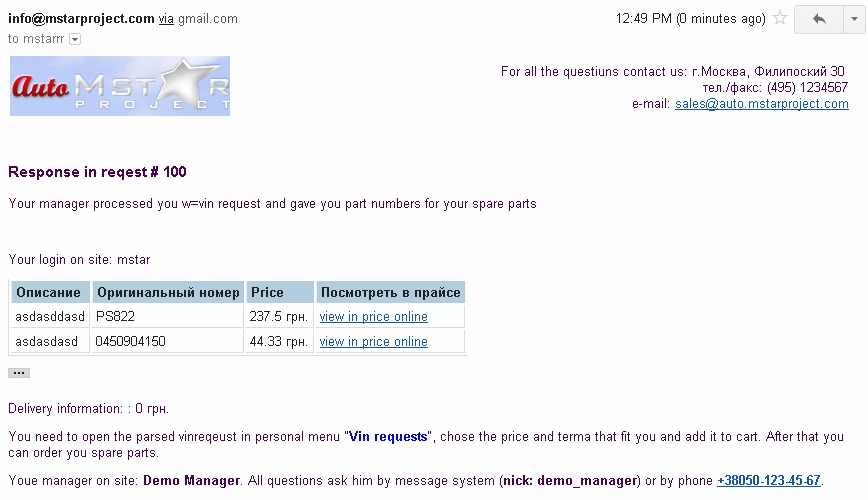
- The e-mail and SMS (if the module sms) is sent as notification after processing the vin request by manager
A copy of this notice is edited in mPanel in the module "templates" codes "vin_request_sent" and "vin_request_refused" for successfully processed and failed requests, respectively.
Catalog
This module is designed to search for parts using a selection of cars in three steps
1 step. Auto manufacturer
Step 2. Choice of model cars
Step 3. Select the type of model cars
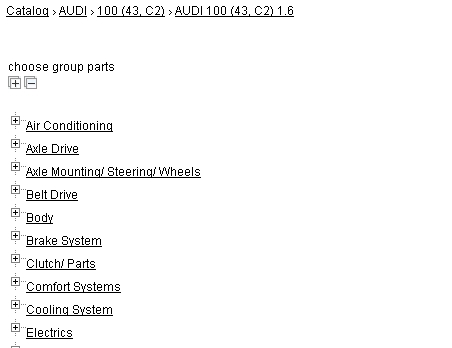
After selecting a car, will be invited to the group tree parts of the car.
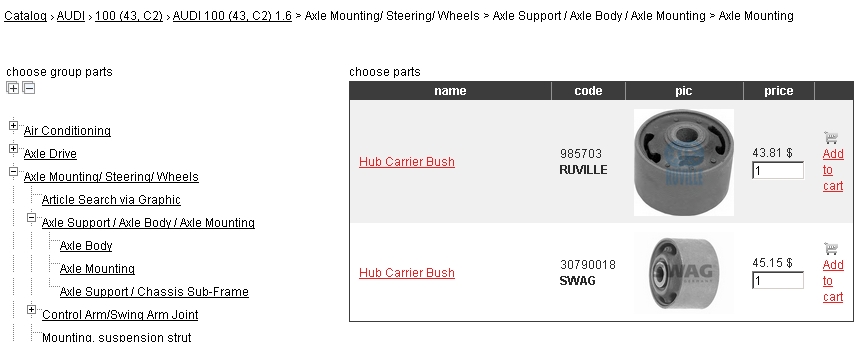
Selecting the group will be printed parts that are in this group of cars loaded and price, ie those parts that the site has to offer to purchase. For each parts will be displayed brief information: name, manufacturer, code, image, price and ability to put in the basket. Name of parts - a reference to the card products
Each card has a spare part item. Which shows the image of the parts (to increase the need to click on the picture), specifications, codes and spare parts that can replace this spare part, as well as a reference to the applicability in other cars.
News Module
News module edited mPanel
>> mPanel>> Content> News
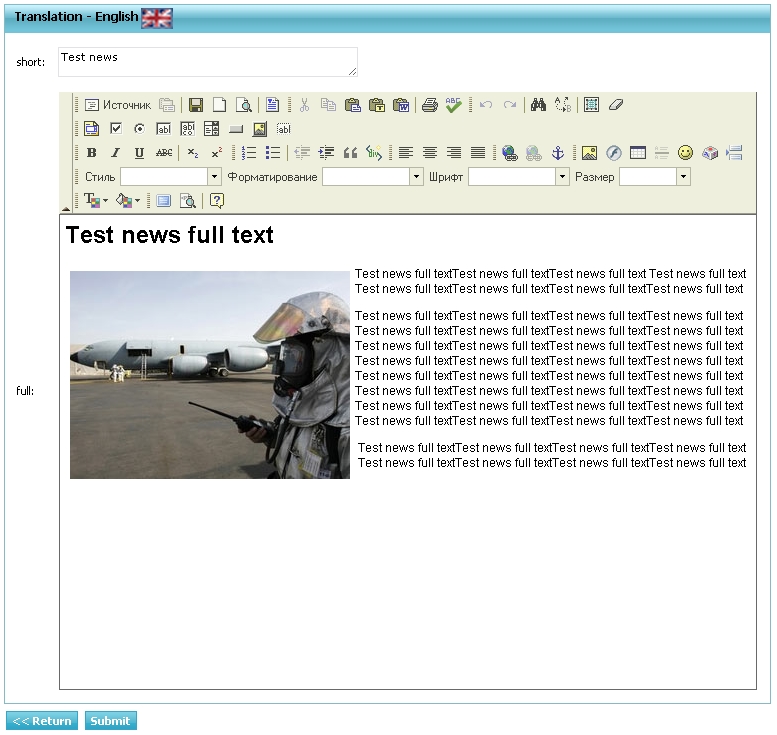
It is possible to edit a html editor and insert pictures. If you do not crow "There is a link on the preview news" - news that will be just a matter of fact, without reference to the announcement of the full version.
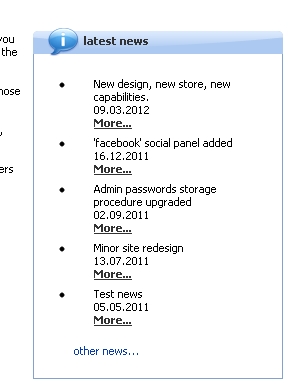
Last 5 news are shown in the announcement (in constant mPanel "news: max_limit"), for example on the home page or all pages of the site:
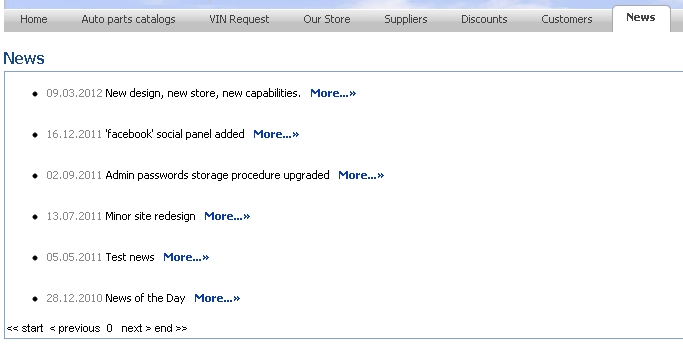
Well news module can be found at http://en.auto.mstarproject.com/?action=news
The text at the top of the table being edited in the News "Page Editor" mPanel
Sphinx based full-text relevant search with morphology
Fulltext search does not suit to the majority of spare parts. But there is 5-10% of goods, which need it catastrophically. And our standard search with essentially direct cross connections and clearly indication of car model and car brand from tecdoc does not suit to this group of goods. Example of such “wrong”goods: oils, buses, batteries etc.
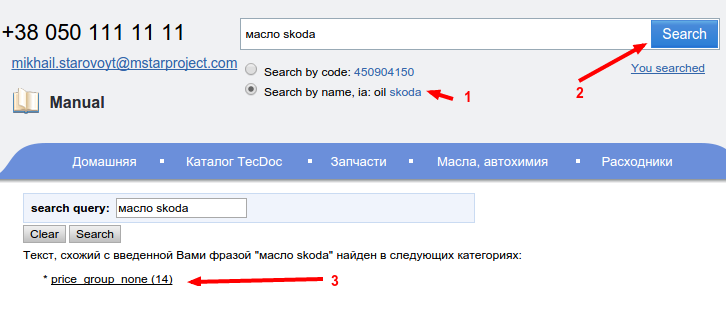
In order to get list of goods where we can see this word combination one should choose right radio button (1), enter searching text and press search button. Search results (3) are sorted by relevancy and if it has more then 20 items we will see only 20 first the relevantly closest to searching phrase:
By default in case after code search there is no result automatically fulltext search with the same phrase starts. This action can be turned off by selecting constant global:empty_price_redirect equal 0.
Pay attention, fulltext search is easy to use when you do not remember exact code, fulltext mode searchs goods by incomplete/partial code.
Price request’s history, search by code
Module is required for saving all entered codes close to hand. Very often one can find code, enter to the search and forget. Site remembers for guest’s session duration only and for authorized user history will be saved for month. Module is located by the link "You were searching" near the code search button:
Underneath on the screenshort searching history is represented as table:
Garage of cars
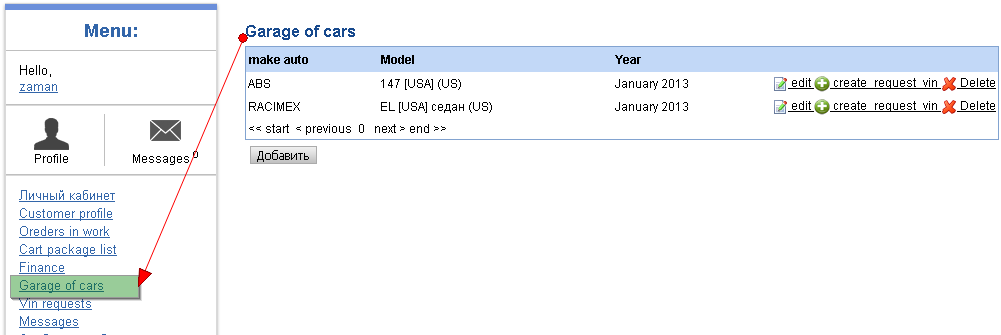
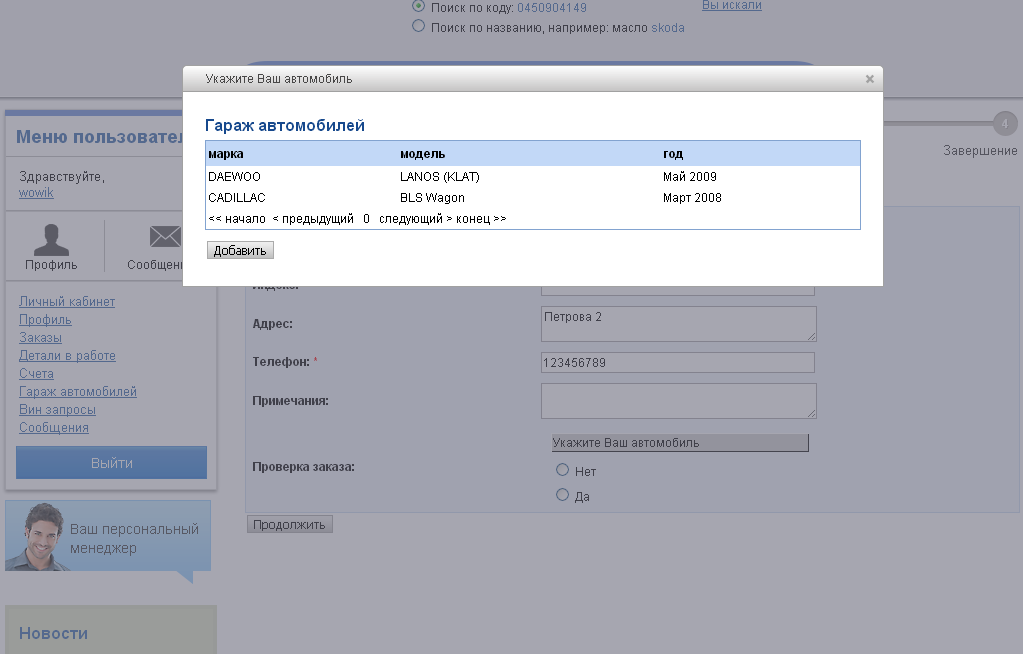
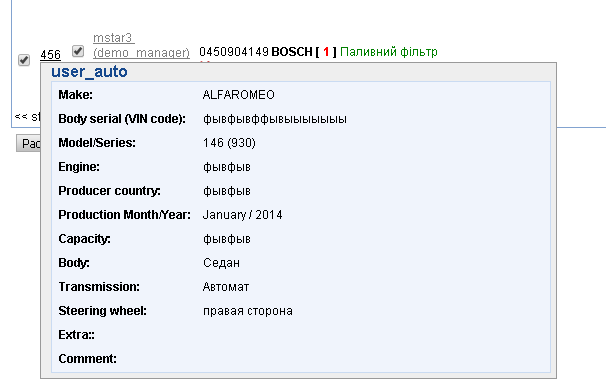
Customer’s menu has item – (1) Car garage which contains car’s list. This list fills customer by his own.
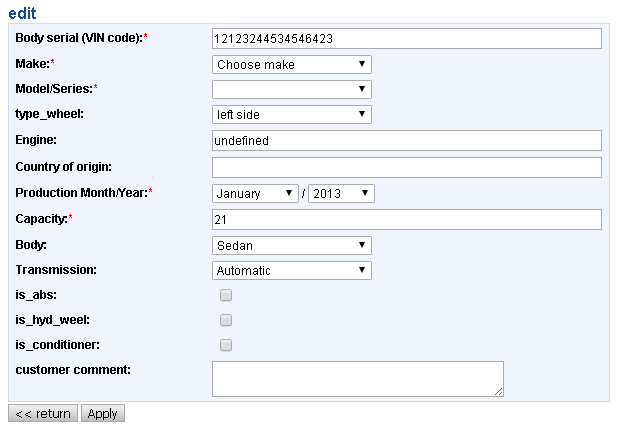
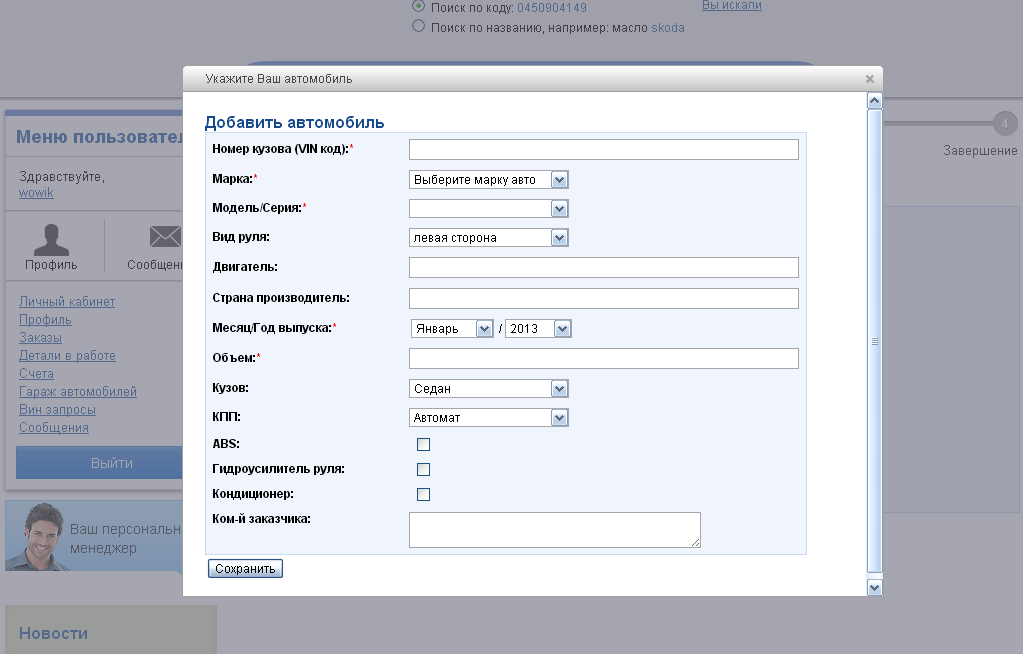
By means of button “Add”customer receives on the screen the form where he fills fields of his car. Among the fields there are obligatory, they are marked “*”,besides car’s table has such opportunities like editing of created record about the car, creating Vin request and removing record from car table.
This data can be used every time creating VIN request for spare part and creating order.
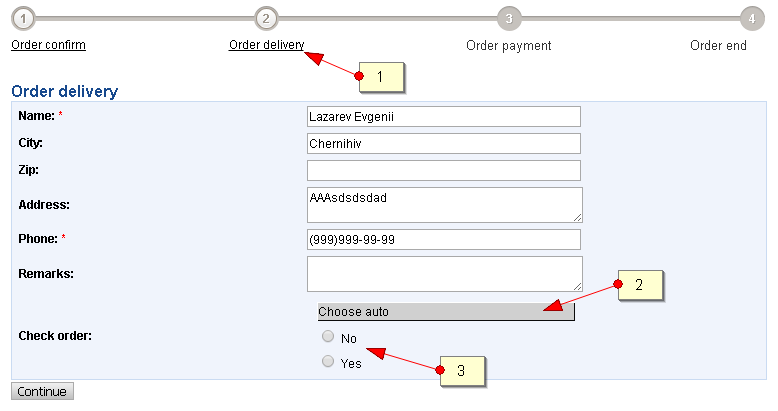
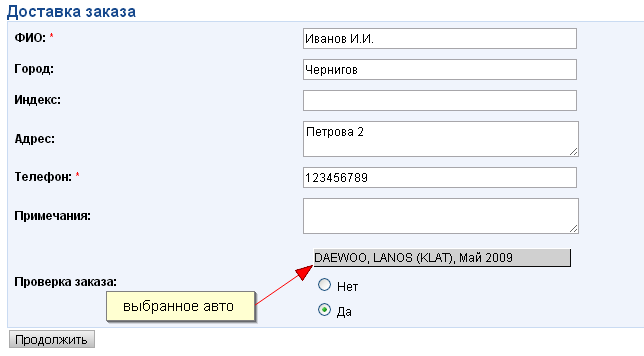
Making order this mechanism is used on step 2 – “ Order delivery”.
1 - step ' Order delivery '
2 – panel of choosing car from list of own cars
3 – buttons where customer point if it is necessary to check for compatibility order’s information to his car
If car list doesn’t contains requested one or this list is empty, customer does not have to stop making order. Will be enough just press the button Add in the list and fill car information on the form appeared.
Form will appears instead of the list:
After choosing the car or creating new record about car popup windows will be closed and the customer will have ability to continue making the order and on the car panel appropriate record will be selected.
Payment messages
Modul of payment messages gives customer ability to create messages to site administrator about made payment.
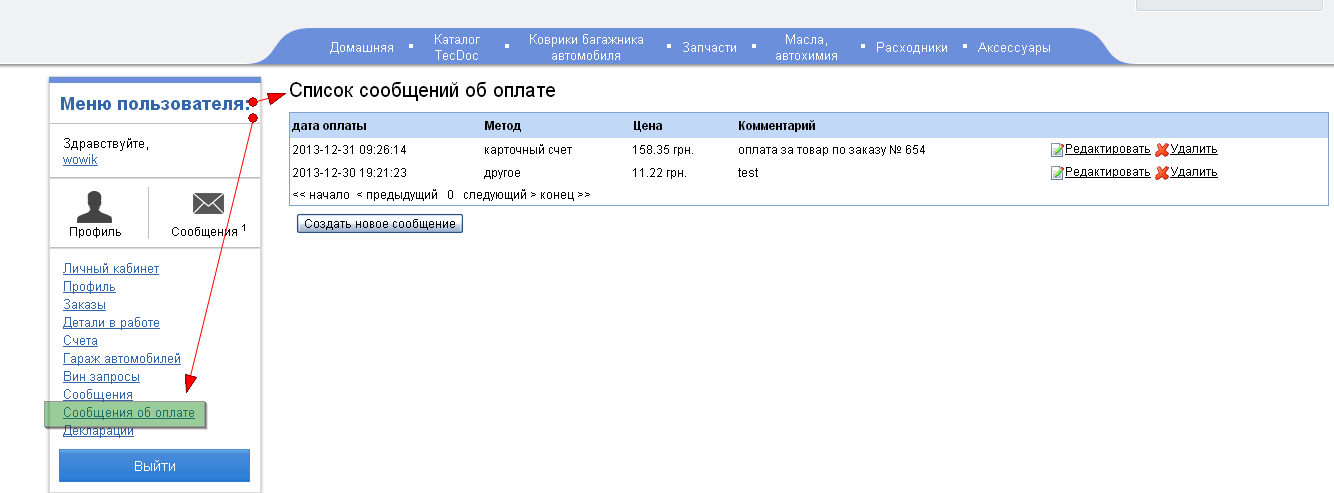 Файл:Payment report 1 en.png
Form of creating messages consist of fields:
Payment date – is obligatory to enter value in format day-month-year hours:minutes:seconds, for example: 31-12-2013 20:10:00.
If the field is empty – current values will be determined.
Method – selecting from the list.
Price - obligatory field, it should be field by numeric value that is more then zero.
Comment – either text.
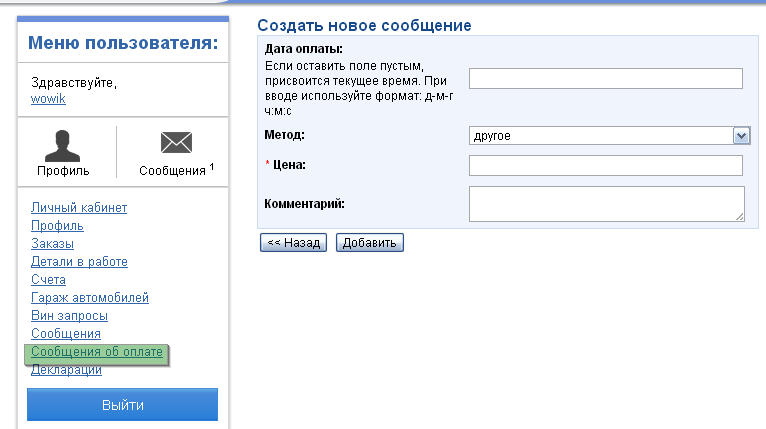 Файл:Payment report 2 en.png
After payment messages are created customer can see changed message list and confirmation of payment message was created.
 Файл:Payment report 3 en.png
Payment messages could be edited. In order to do it one must press the link "Edit",
Then form with message information will appear. After editing press “Edit”.
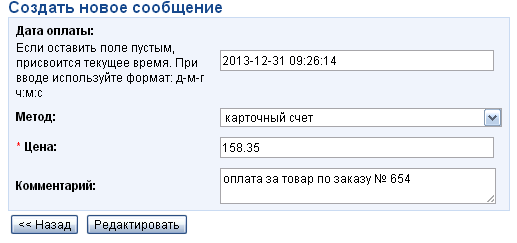 Файл:Payment report 4 en.png
Except editing one can remove messages. Press “Remove”, before removing modul will ask customer
Again about execution of the action.
 Файл:Payment report del en.png
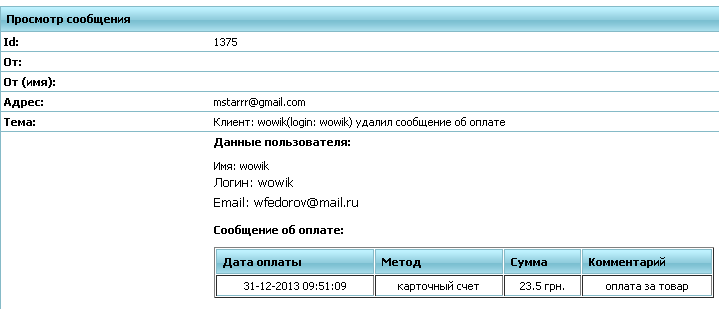
When customer do creation, removal or edit of the messages module will send messages on email
Of administrator.Email address is indicated in constant - payment_report:to_email Underneath one can find email examples:
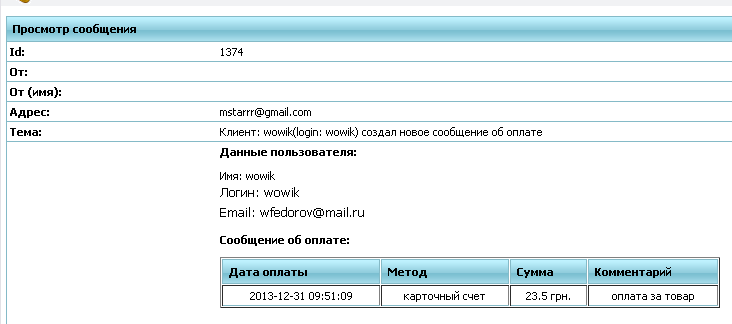 Файл:Payment report 5 en.png
 Файл:Payment report 6 en.png
Templates of emails are stored in empanel - Templates - (code - create_new_payment_report)
Sending declarations
Module provides the customer information about goods that were send.
This is table with field list:
 Файл:Payment declaration user (1) en.png
New declarations are always on top.
After creation or removal of declaration customer will receive notifications by email.
Manager area
Load prices of various providers
Pay attention on downloaded files format Excell 2003 (*.xls)!
Number of raws there can be 65536, but loader accepts 65535!
Downloading these files there are no errors but items do not downloads, in order to solve problem delete last raw in the file.
This module allows you to add the price of the computer as a manager
To add price to use the default profile to:
1. Create provider be sure to set currency prices, and remember his login
2. Login to the Load Price page 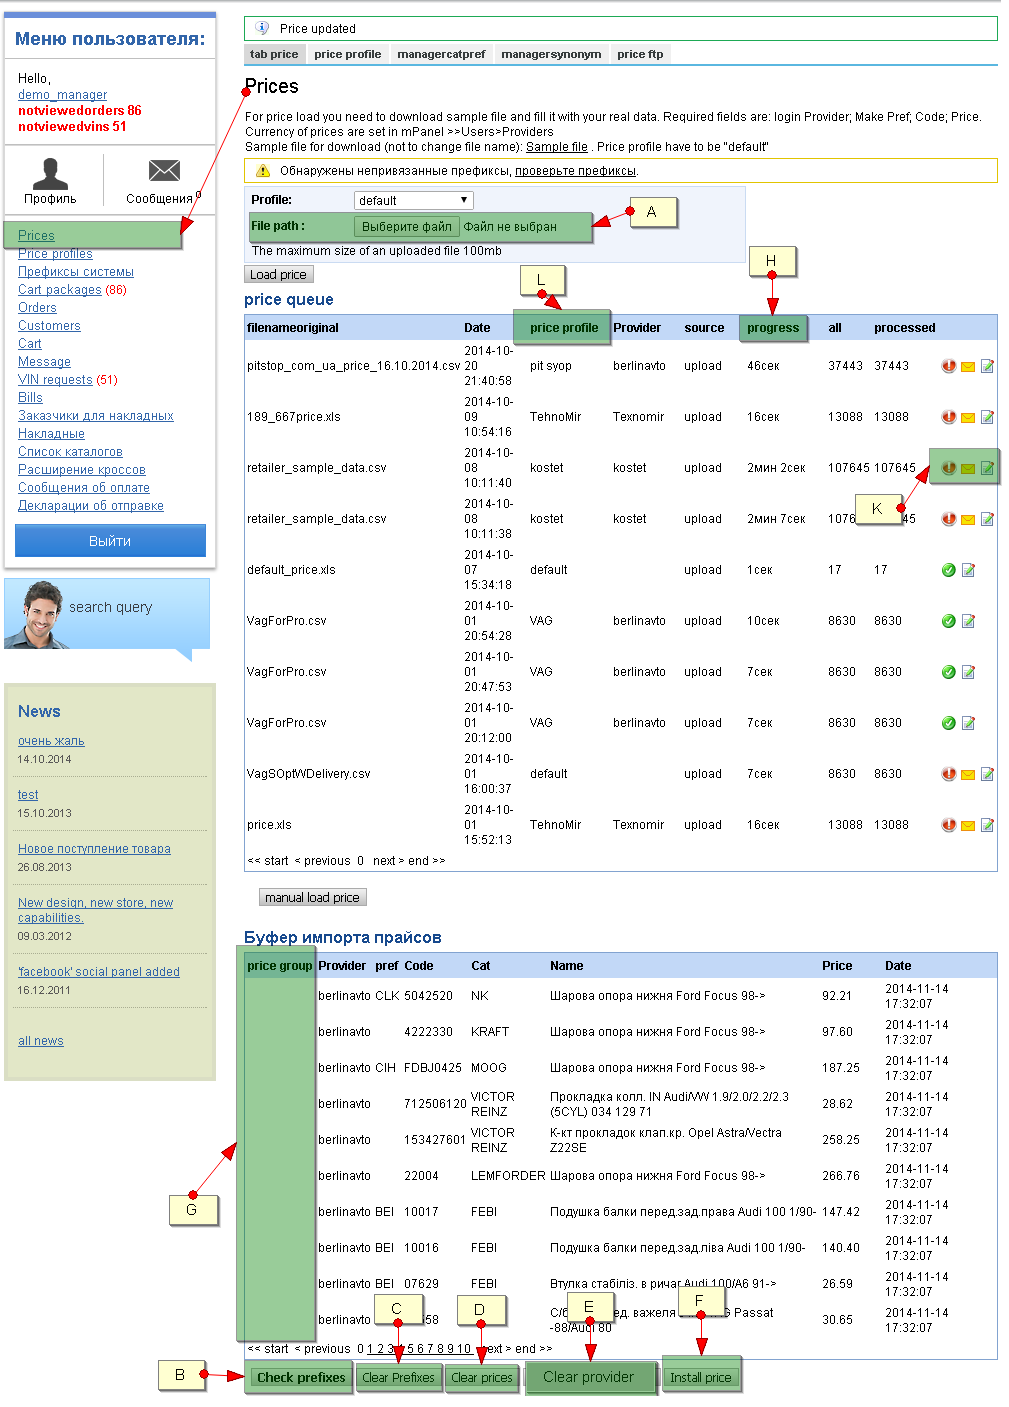
New constants for price processing were added to M panel settings:
 - PHPExcel:add_path – after leaving it empty old version of library and PHPExcel (on default),if it will be replaced by"_1.7.9" – new one.
 - price:type_load – mode of price download format xlsx.
   Variants:
     "all" – as for old library as for new one ( for large files it needs more memory)
     "partial" – loading by 10000 raws,it can be used only with new library.
 - price:break_load_file_in_minutes – time of hang processing in minutes, over this time file loading will be stopped because of error( 5 min on default)
 - price:break_global_load_file_in_minutes - time of suspension global processing flag in minutes price:on_load (60 min on default),
   On the expiration of time flag will be reset to initial condition = 0 for continuation of the work.

A. Path to downloaded file . Here but beneath maximum available size for loading is specified.<price:break_global_load_file_in_minutesbr>
   Can be loaded files with format: xls, xlsx, csv, txt, rar, zip.  These files should be in archives(except rar, zip).

B. After loading prices in file errors could be discovered, errors in brands’names. All of them will be gathered here.

C. If columns code and brand were specified incorrect we will see a lot of prefix errors. This button clears list of all errors

D. Remove prices from intermediate table (those from this window)

E. Remove prices from the basic base of suppliers loaded to intermediate table

F. Add pricesfrom intermediate table to the basic base

G. Affiliations to the group

L. During file downloading by one of the paths (upload, ftp, mail), it appears in the table with filled column "Prices’ profiles".

   File affiliations to the profile is determined by it’s name, it is specified in parameter "Name of the file’s template" in !link! edit of profile.

H. Field can contain several values and shows current status by price file:
   - If file has not passed off the processing yet it would be empty.
   - If file is in the process – one can see running line with percent of the process.
   - If processing was interrupted – inscription will appear "Stopped".
   - In case file passed the processing we will see time spent on this task or "Done".

К. This is icon block for viewing and management of price raw:
    Файл:Price ok en.png – price file was downloaded without mistakes (is not clickable)
    Файл:Price err en.png – during the boot errors were discovered (is not clickable)
    Файл:Price letter en.png – in case during the boot errors were discovered corresponding letter will be sent to email specified in M panel
(variable "global:to_email") and letter with errors could be looked through clicked on this icon
    Файл:Price stop en.png – icon lets stop the downloading of the price file
    Файл:Price edit en.png – icon gives ability to change for file such parameters as
       (Supplier,Profile, processe – if processing flag is set file will not be processed,
       If check is not marked file was sent for prcessing)
    Файл:Price del en.png – icon lets remove file from the download queue.
Important point:
 After price downloading data go to buffer table  bottom and after processing will be loaded to price:
  - automatically, if in profile flag is set  Automatically fill price at startup? but excluding faulty
  - will stay in buffer table until your decision or you will put them to the price by button Set prices, or remove them Clear prices
 Records in this table will be saved during 7 days and will be removed after.
3. Download a sample file

4. Fill in the appropriate columns in the file
Column "ID_PRICE_GROUP" indicate code(number) of the group of detail. More.
5. Import the data after a successful load (will appear on the screen)
6. Check for prefixes - to establish compliance with brands brands system
7. Set the price, after the installation price data will be copied into the main price table
After downloading of file automatically prefix check takes place and in case there are unbound prefixes message is displayed:
To add price to include your own profiles to
- Create vendor be sure to set currency prices, and remember his login
- Create Profile
- Rename the file according to the name of the template file in accordance with the rules: the first characters to underscore must match the name of the template file and end with an underscore (for example default_new_provider.xls, default_.xls, default_price.xls)
- If the file is larger than 8 MB then it must be added to the zip archive.
- Login to the download page, pricing
- In the Path to file: choose the profile that you created in the Path to file: select the file (zip archive) corresponding to this profile
- Load the data after a successful boot (to appear on the screen)
- Check for prefixes - to establish compliance with brands brands file system
- Set the price, after the installation price data will be copied into the system
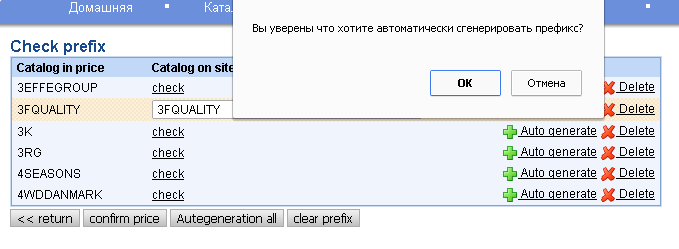
Prefix check
On this page we can see unbounded manufacturers’ names. On loading of the price in column Manufacturer appeared unknown names. Without the bound such manufacturers will be ignored.
Or bounding one should in front of the necessary name press button Check and set exsisting. It gives ability to choose necessary manufacturer.
If list does not contain such manufacturer it could be created using link with greenCreate new brand on the right from choice. After confirmation new brand will be created and raw will disappeared from the list unrecognized, and new brand will be added to the end of the brand list choosing from the existing.
Also on the page "Prefix check" there is button Create all new brands. This function lets create automatically new manufacturers by all unbounded prefixes. Pay attention, you can bound by hand to already existing manufacturer and this action only creates new manufacturers.
When an unexpected failure or error handling when loading prices, the subsequent loading may cease, and the screen would be a mistake
Now is loading price (the price is loading)
To resume the boot loader should enter mPanel>> Options> Constants and set the value of the constant price: is_load = 0
Configuration price profiles
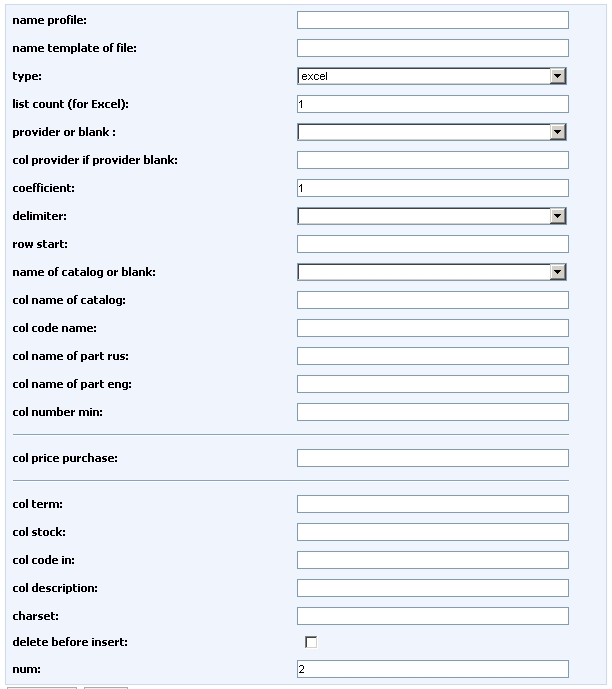
To simplify the loading of prices from different suppliers have the opportunity to file under each provider to create their own profile
The example shows the default logic of creating the profile.
The name of a template file: file name before the first underscore
Type: To select a file type (Excel, csv)
Number of sheets (for Excel): to download files eksel more than 1 sheet
Supplier or empty: Supplier Selection
Column number supplier if the supplier is empty: If you do not select a vendor in the column above it is necessary to specify the column in which you want to write the login provider
Koefitsietn: the value at which the purchase price will be multiplied
Separator: For text, you can download from, or tab
Number line start downloading: start file download
The catalog name or null: selection of brand
Column number the manufacturer's name: if the brand is not selected, you must specify the column in which to brand name
Column number of code parts:
№ Name column (RUS):
№ Name column (ENG):
Column number of minimum count:
Column number of the purchase price:
Column number of delivery: column with term delivery
Number of available columns count: Column with the remains
Column number sheet provider:
Number Columns describing parts:
Encoding: For text delimited files, you must specify the file encoding usually or windows-1251 or UTF-8
Remove insert before: the prices of the supplier, which were loaded into the system before adding new will be deleted.
Ordering: sorting profiles.
№Columns of the spare part group.
Group update: in pointed condition details’ group from the loading price will replace those that were loaded to the system
Fill the price automatically on startup? – after file processing data transfer from the buffer table to online-price should be done or leave in buffer
A. Column numbers can be specified for that they are in Excel (A,B,C,D...)
Settings details of price profiles for text file use
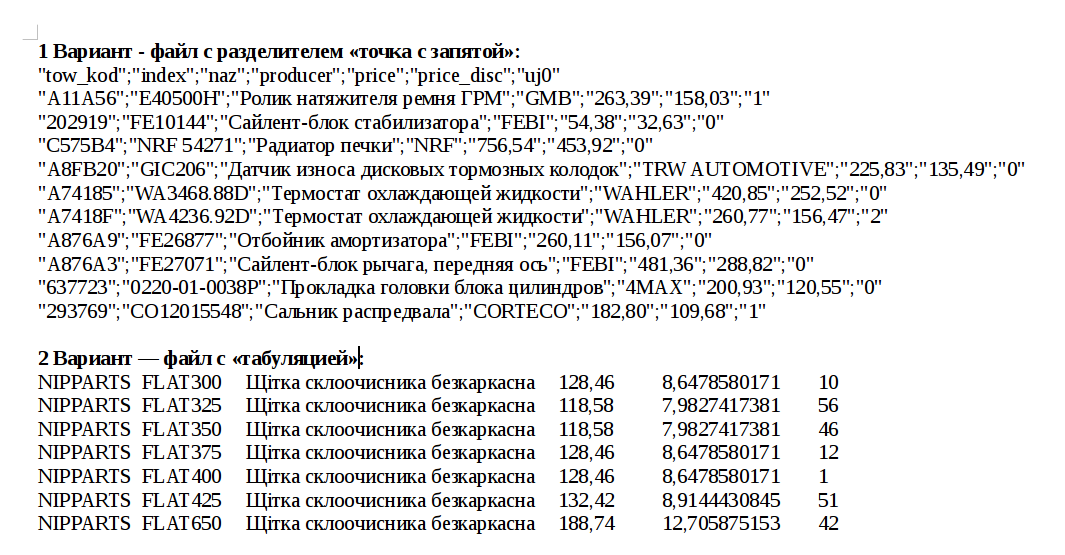
Text files that contain price data should have format CSV. This format presupposes existence of raw with fields. Fields can have several variants of divider: comma, semicolon, tab. Below there are 2 examples such files.
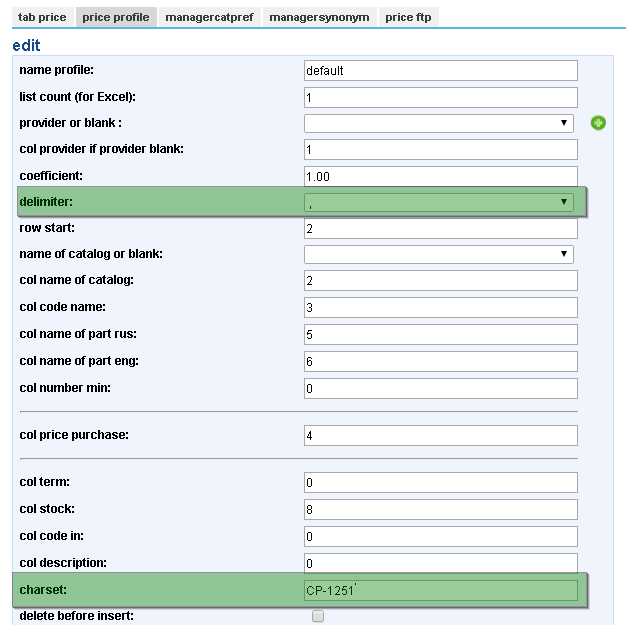
For the reception such files very important to set 2 parameters for correct reception them on site: - divider - encoding – if file was create in Windows, mostly it is true, then in field encoding should be specified "CP-1251"
It's desirable first time receiving file of such format do not set Automatically loading to price in profile so that after processing all records from the file remain in buffer and you could review it superficially for correctness, for example, was encoding correct or no. If this field is empty or unreadable text, that means last file was not CP-1251, in that case just clean encoding field, do price cleaning so that initialize buffer table and redownload file one more time.
By the way such practice is very usefull – for the first time download with buffer view and for the future there is sense to set automatically receiving.
Catalogue list
Module Catalogue list is duplicate from the administrative part and it is complete analog.
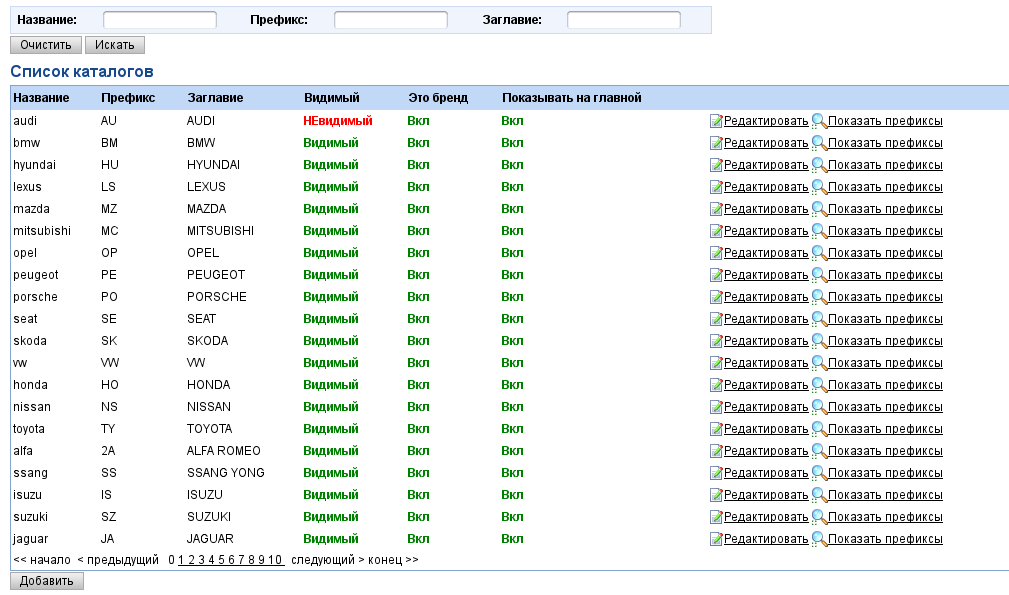
Module has the form:
In upper part there is filter by general parameters. In table we can see all manufacturers available in the system, with ability to edit and view bounded prefixes. In lower part there is button of adding new manufacturers.
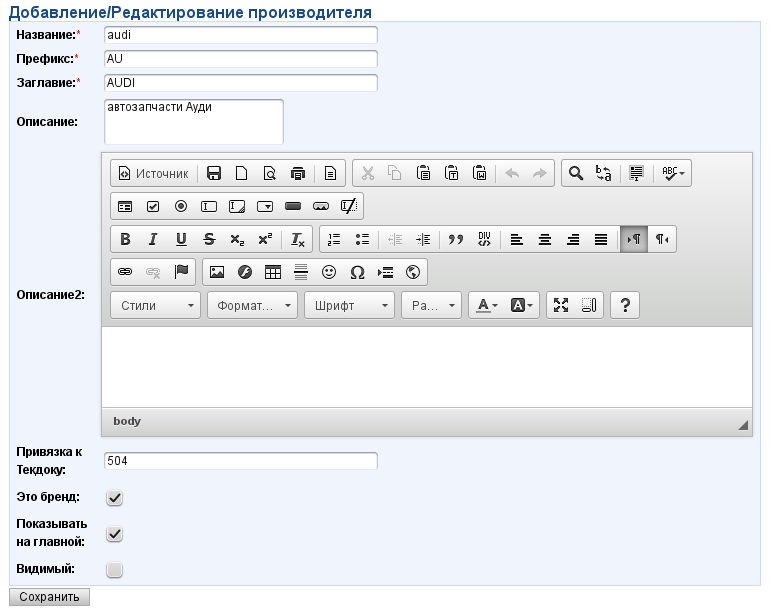
On editing the manufacturer window has next form:
Name - stuff field, is used in the main page address, for example http://irbis.mstarproject.com/?action=catalog_model_view&cat=audi . In this field should not be present symbols /, _ and possibly some others, it depends from setting of module processing.
Prefix - field for bound with manufacturer, can contain less then 3 symbols, it is desirable not to change it after loading details with this prefix, as details are bounded to it exactly.
Title – field is used for outputting of manufacturer name.
Description – short description, can be used, for example, on the page of choosing car brand Tecdoc.
Description2 – full description.
Bound to Tecdoc(ID_TOF) – specify identifier of this manufacturer in Tecdoc. Table contain bonds brands and identifiers of Tecdoc: Файл:Tof brands.xls
This is brand – brand pointer.
Show on the main page – pointer of manufacturer’s display in choosing Tekdoc’s brand.
Visible – manufacturer’s visibility on the site, if it is invisible – this manufacturer will not be displayed anywhere on the site, also its details will not be displayed either.
System prefixes
Module System prefixes is duplicated from administrative part and it is analogical completely.
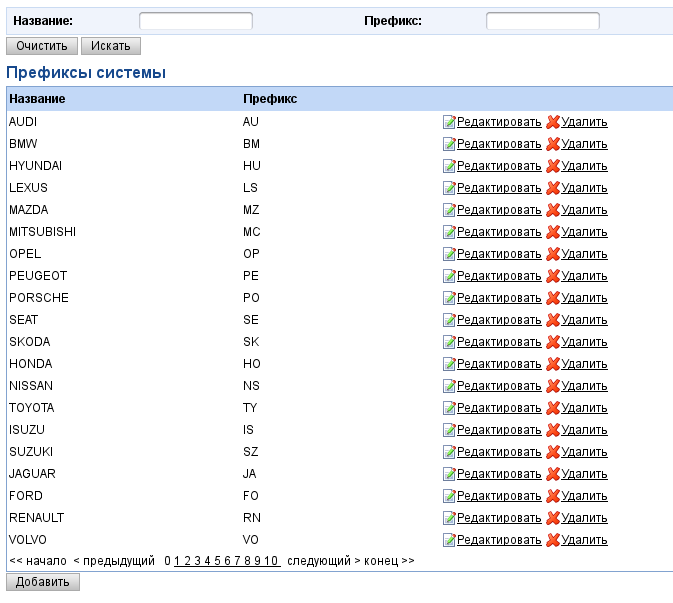
Module has such form:
In upper part there is a filter for main parameters which is aviable. In the table there are all prefixes’ connections with ability to edit and remove. In lower part there is button of adding new bonds. Prefix bonds are used in general for searching necessary prefix from quantity of manufacturers names, for example for downloading price list.
Editing manufacturer the window has such look:
Name – one of the possible names for prefix.
Prefix - field for connection with manufacturer.
Brand synonyms
Module Brand synonyms is the most visual system of brand management on the site.
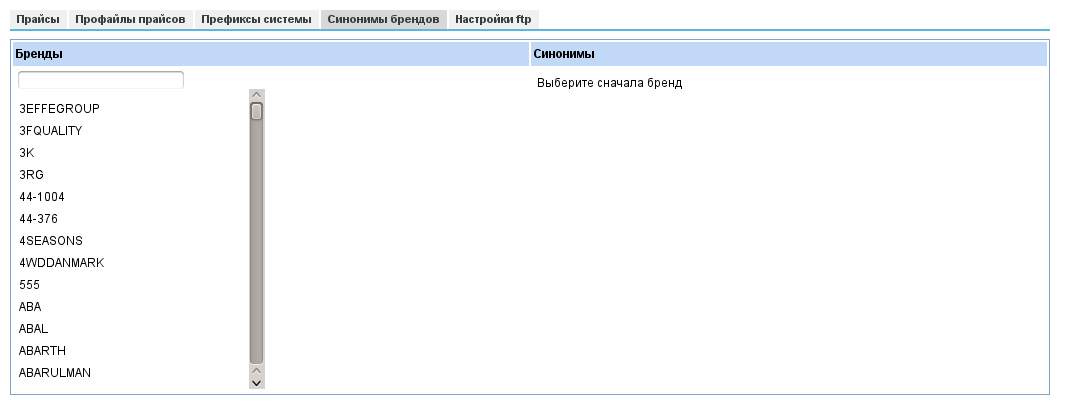
Module has such look:
How it works
In the beginning it is necessary to choose interested brand in the left list, you can use quick search window upper.
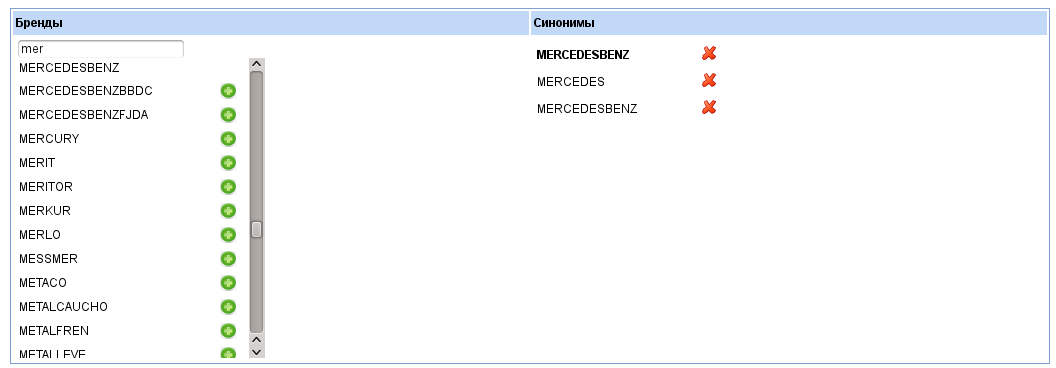
On the right part you will see all connected with chosen brands, in first raw we can see the main brand that has prefixes connected to him. Main brand is highlighted by bold.
Choosing brand from the left part:
After brand was selected in order to add prefixes to the main brand find necessary brand in the left part and press “green plus” in front of it.
Also in order to delete bond to main brand press “red X”in the right part. Removing main brand unbounded prices and orders issued for this brand’s goods can be missed in the price list.
Number parsing on price list loading
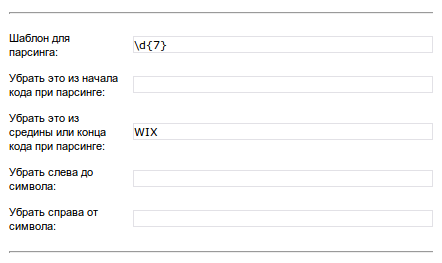
Module settings is made in Mpanel, partition Car catalog – Catalog list. Choose necessary catalog (manufacturer), press “Edit”in front of it and on the edit form find fields of parser settings,they look like:
Template for parsing – in this field correct variant of detail’s number should be entered, it is necessary to save it price list, it is entered in form of regular expression (more read below)
Remove it from the beginning of the code during parsing – regular expression that will be removed from the beginning of the detail’s number, you can specify several, separate by symbol |, for example AJU|AJ ( conditions should be located in order by reduction of letters)
Remove it from the middle or the end of the code while parsing - regular expression that will be removed from the middle or the end of the detail’s number, you can specify several, separate by symbol |, for example AJU|AJ (conditions should be located in order by reduction of letters)
Remove left of the symbol – specified symbol to which on the left system will remove useless symbols
Remove right from the symbol - specified symbol to which on the right system will remove useless symbols
So let’s consider the example of using these settings.
For example, sometimes suppliers give price lists with details of manufacturer AJUSA and have symbols for use, for example, AJ10064900, AJU10064900. If do not remove anything codes will not be able to bond to data of Tekdoc (crosses, description). That is why is necessary to align these codes to codes in Tekdoc.
We know that code should contain only 7 digits, in this case in field Template for parsing specify \d{7}
And in case code contain of several digits and it can contain one letter in the end, it can be described like: \d+\w?
And in the end, in case code can contain 10 symbols (or digits, or letters, except blank) can specify: \S{10}
But if we are not sure completely in number’s format, but we know what should be cut in the beginning, for example AJ or AJU, in this case we use field Remove it from the beginning of the code during parsing with value AJU|AJ (conditions should be located in order by reduction of letters)
There is also situation when in loaded price list we can see number like TX 95002400 / 98502 0024 9 and it should be cut up to slash, in that case field Remove right from the symbol is used with value /
In case code contain letters and part of them should be left, for example, WIX Filters 51006PEWIX, PE should be kept, and there can find codes of different length and different ending, so in Remove it from the middle or the end of the code during parsing it is necessary to write WIX
Different fields could be combined. About special symbols that are used in the fields one can read here: http://www.php.net/manual/ru/regexp.reference.escape.php
Internal messages and notifications
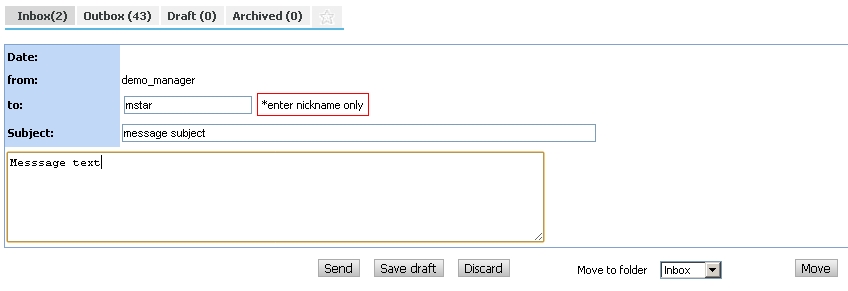
The module is essentially an analogue of the emaling system, only local to the project. On the forums and blogs this is also known as "Messaging". The user may not have email, but he needs notice and an opportunity to communicate the project.
Also, the customer will be sent automatically notice, and that was the argument "message is always delivered," and did not get a spam filter antivirus removed - we will deliver the internal communications. After delivering the letters to internal messages, unless the customer removed the checkbox and it is well filled-mail - a copy of messages sent to his mailbox.
Module is at: http://en.auto.mstarproject.com/?action=message both the manager and the customer:
As well as regular mail, internal messages are divided into folders. At the top of a search form on the letters. Users can assign a sign of "Favorites" and the corresponding icon to filter only selected messages.
In order not to "lose" all correspondence and managers can not delete your letters the same - instead, implemented a procedure archiving messages, which can eventually pick up and find.
Instead, addresses are used by user logins:
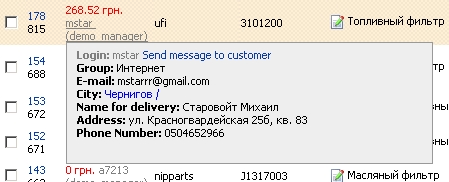
To simplify the task of writing a message to the customer - in short a card for each client there is a link "Contact customer":
The same reference to the creation of a letter to your manager and the client, most often in the visible part of the interface of each page and in the profile, which also indicated a client manager.
Orders
The module is required to view and order management. http://en.auto.mstarproject.com/?action=manager_package_list
Order a set of ordered spare parts that the customer has issued at a time. May consist of one or more parts.
The module consists of
- Upper links for quick filtering of orders for order status
- The main filter

Which allows you to find order by order number, customer login, index of the customer, order status, parts makers and code parts
- Orders table

In the column "ID" are a link to edit an order that leads to order form editing
In the column "Date / client" are references to a reduced customer card, the date of your order and the balance of the customer.
In the column "Code / Manufacturer / Number / Name" is a summary of the Order Parts of this order.
In the column "price" the cost of parts and shipping costs for this order.
In the column "Total" the total value of the order and sign the payment of this order.
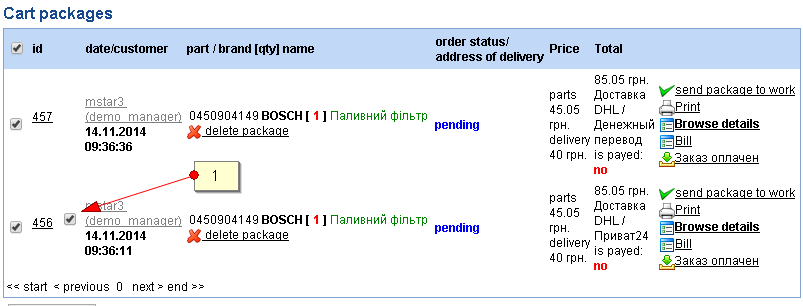
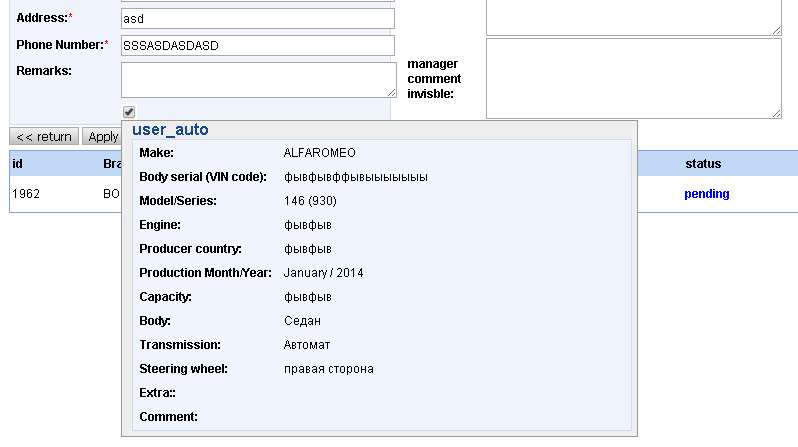
1 - customer making order asks do the verification of the order for conformity details to its car. On mouse move to checkbox car information will not appear on the screen.
After data check manager set pointer in specified position by mouse click or in case of necessity to turn it off.
Order Form Editing
Consists of two parts
- Order top
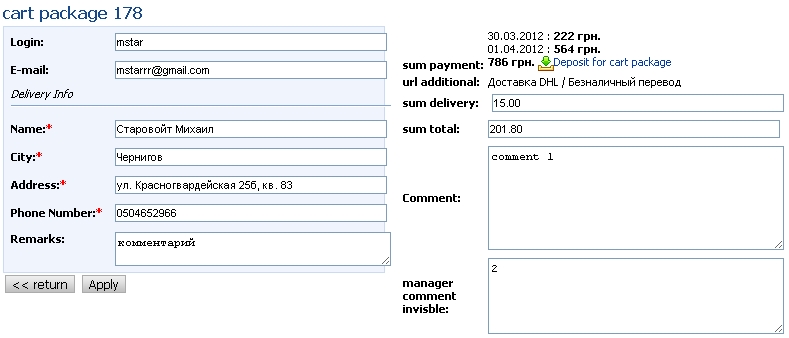
Allows you to edit the order information: data about the customer comment to the order, payment information. Allows you to add a hidden comment to a manager. Do you have a link to make payment under this order.
In case in the process of making order customer specified wish to check compatibility ordered goods to his car, in order’s edit checkbox with car data will appear there.
Manager can set sign check and get it dawn.
- The table of order items

Displays information about the positions of the order, and also have a link on the column title to change the names of parts, and a link to the last column of the form of changing the status of the position.
Manager’s order for customer (phone order)
Module of Manager’s order for customer (phone order)is important in order manager could make order for client, for example by phone call(phone order).
In process of detail search manager can add necessary detail to the basket.
After making order manager visit basket and register the order.
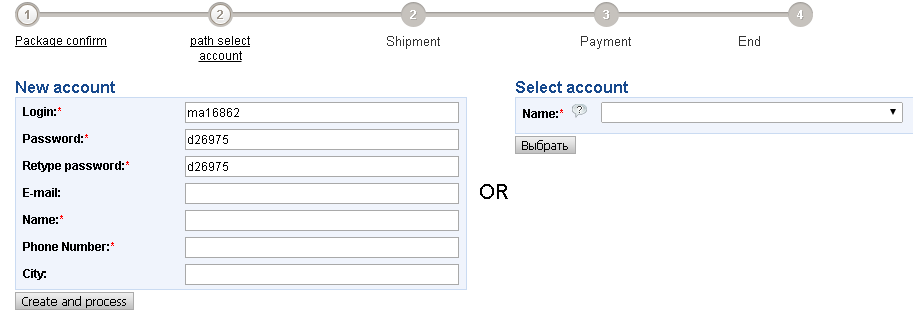
Second step is choosing of client. If it is not on the rolls it could be created. For this transaction only client bonded to manager are available. Creating new client it vill be bonded to the current manager. For the comfort login and the password for the new client is created automatically and they could be changed by your decision.
Orders in work
This module is designed to work with all positions ordered customers. http://en.auto.mstarproject.com/?action=manager_order Provides information and makes it possible to modify the data for parts that have been put in orders. Consists of
- Quick change of status

To change the status of the position with the panel to select the desired check boxes in rows and click on the desired status. The panel is always at the top of the screen when you scroll positions.
- Header table (filter positions)

Contains fields for the search
cp - order number
Customer - login name or part of the customer
Brand - manufacturer of the ordered position
Code - code ordered position
Name - name the ordered position
Provider - the provider ordered position
Date - selected period for which orders have been made
The status of the position - the status of positions
- The table positions

In the column "CP" are the order number, a link to quick filter on request and the ID position
In the column "Customer" are the customer's balance, login name, place the mouse on the login appears briefly card customer service manager of the client
In the column "Brand" is information about the manufacturer.
In the column "Code" is code ordered by position.
In the column "Name" is located the name of the ordered position, as well as a link to this name change.
In the column "Provider" name of the supplier is located, as well as a link to change the supplier
In the column "price" is the price of ordered positions, and the purchase price is loaded into the system.
In the column "Qty/Total" is located the number and total value of the position, ie count multiplied by the price of one position.
In the column "Date" is the date ordered by the position
In the column "status position" is the current status of the position and the reference to the history of status changes for this position
The last column is a link to form of status changes and more information on the position.
Form status change position
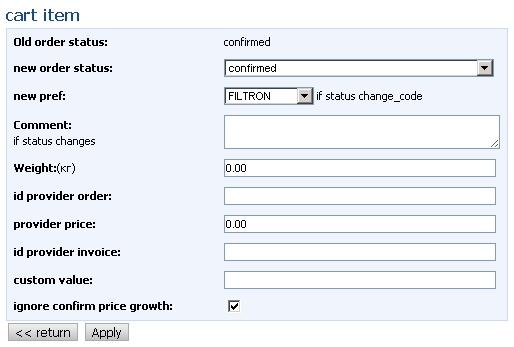
Displays information about the current status of this position and to change the status to available. If you change the status it is possible to add a comment and additional information about the change position.
When you select a status: Price Change, Change the code Change the count, you need to fill in the "Custom value", ie establish a new value of the parameter.
Invoices and ending the orders
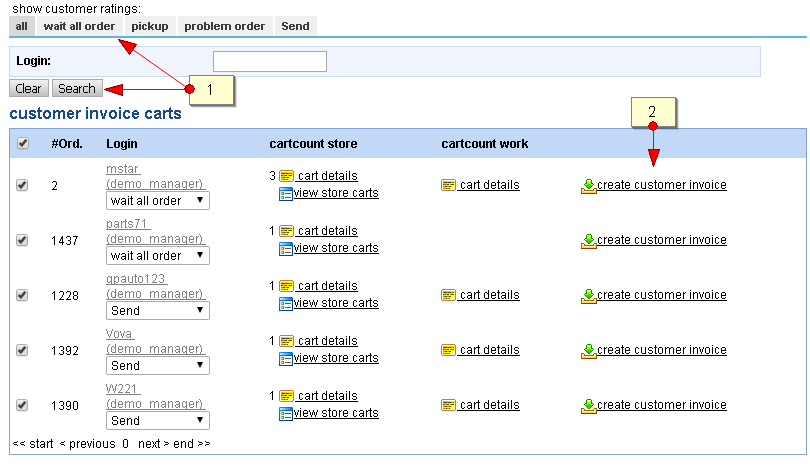
Module of shipping by invoices is necessary for shipping (give) received details at the storage: to the buffer go only those goods that were supplied to the storage with status “at the storage”. Every customer has “storage rating”, using it he can manage his shipments in module Profile.
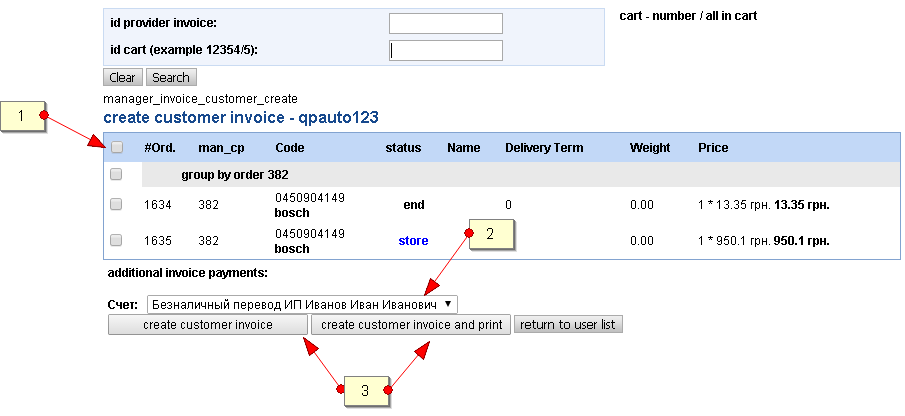
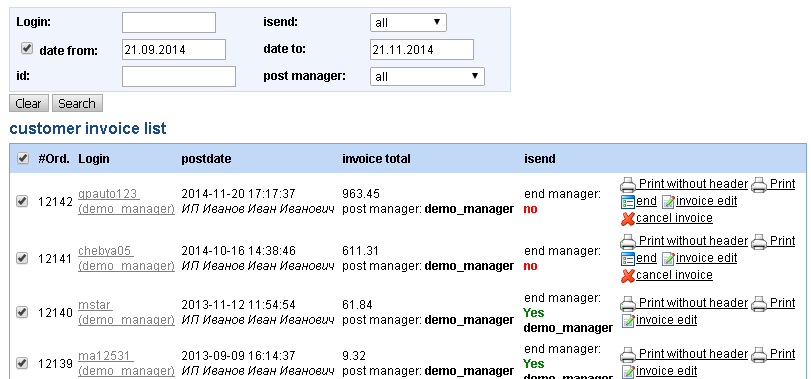
For displaying customers’ buffer for shipping it is necessary find customer by searching, or just press necessary rating (1). After that press link Create invoice for customerа (2). We can see page like on the screenshot below.
Spare parts from the invoice are allocated by ticks. You can choose mail details from the drop-dawn list. Buttons are different by fact that second button after creation prints this invoice. Created invoices are displayed in the table below. In the user menu there is link for this list.
Unshipped invoice could be canceled, it can be returned to buffer Spare parts from invoice. Link "Issued" will ship all spare parts from the invoice.
Cross expansion
Cross settings
Manager has next functions:
- Detail search by code/cross
- Review of added crosses list
- Cross adding
- Cross editing
- Cross removing
- Cross import from Excel(xsl) file
Adding or editing the crosses by hand all forms are obligatorily for filling. For cross adding one should specify codes and details manufacturer and its cross.
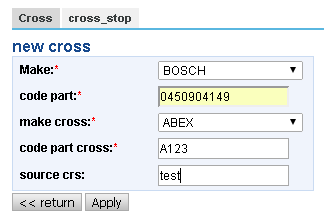
After that system creates two records, one of it will show analog: Original->Cross, second one contra Cross->Original. In order to display analogs correctly in the search by code.
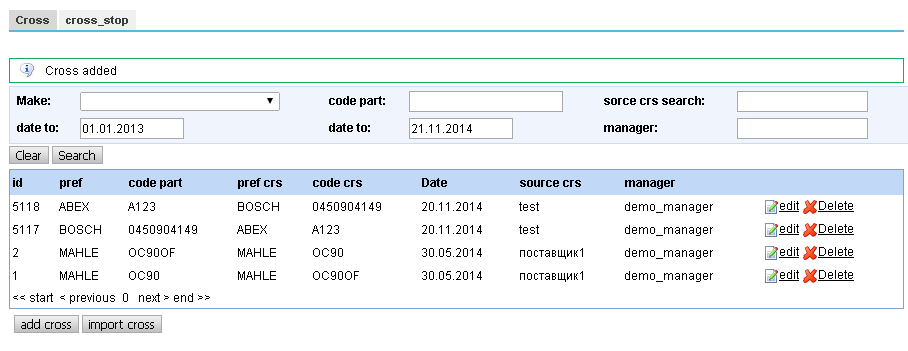
Removing it both of two records will be removed.
Import of crosses is made by pressing button "Import of crosses from Excel(xsl) file", choosing xsl file and following pressing button "Download".

In order to import crosses from Excel(xsl) file it is necessary to prepare file Excel(xsl) format Excel 2003, in this file every raw has 4 filled columns on the first page:
- Manufacturer of spare part
- Spare part code
- Manufacturer of cross
- Cross code
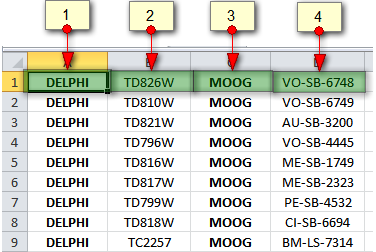
As a result of loading crosses will be displayed in the list and will be involved in search of spare parts.
Stop-cross settings
Using stop-crosses it is possible to block erroneous tekdoc crosses if there are some.
Manager has next available functions:
- Detail search by stop-crosses
- Review of list with added stop-crosses
- Adding of stop-cross
- Stop-cross editing
- Removal of stop-cross
Work of these functions is the same with functions Crosses and it is described above.
Payment messages
Module gives managers information about customers’ payments. This is the table with fields list:
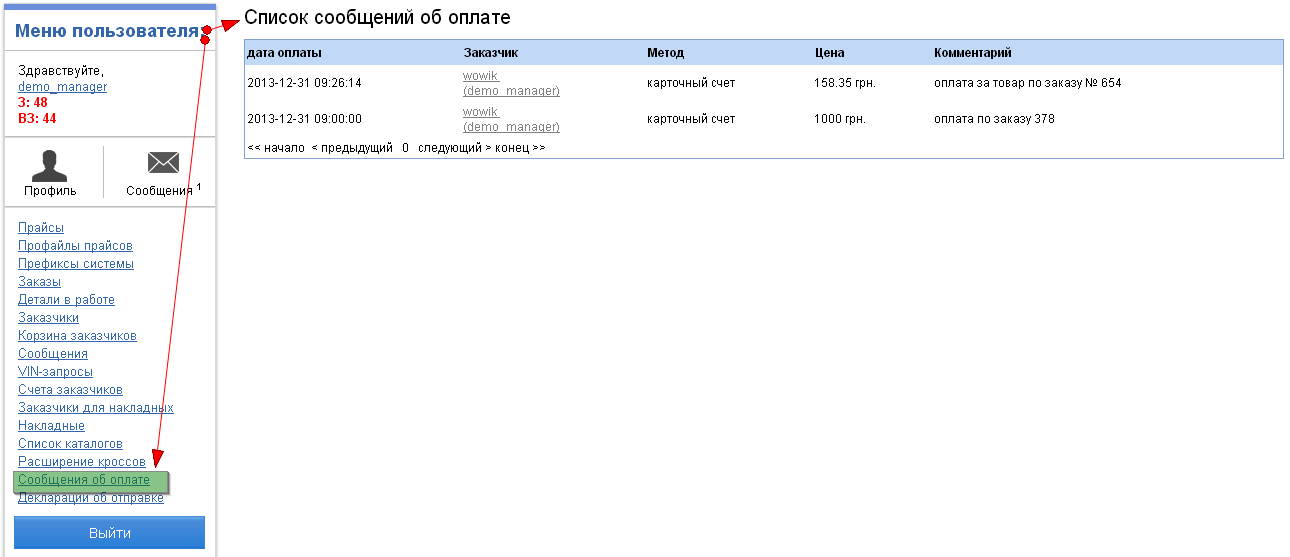 Файл:Payment report manager en.png
New messages will always be on top.
On creation or removal of messages manager will receive notifications on email.
Email for receiving messages is stored in constant: payment_report:to_email
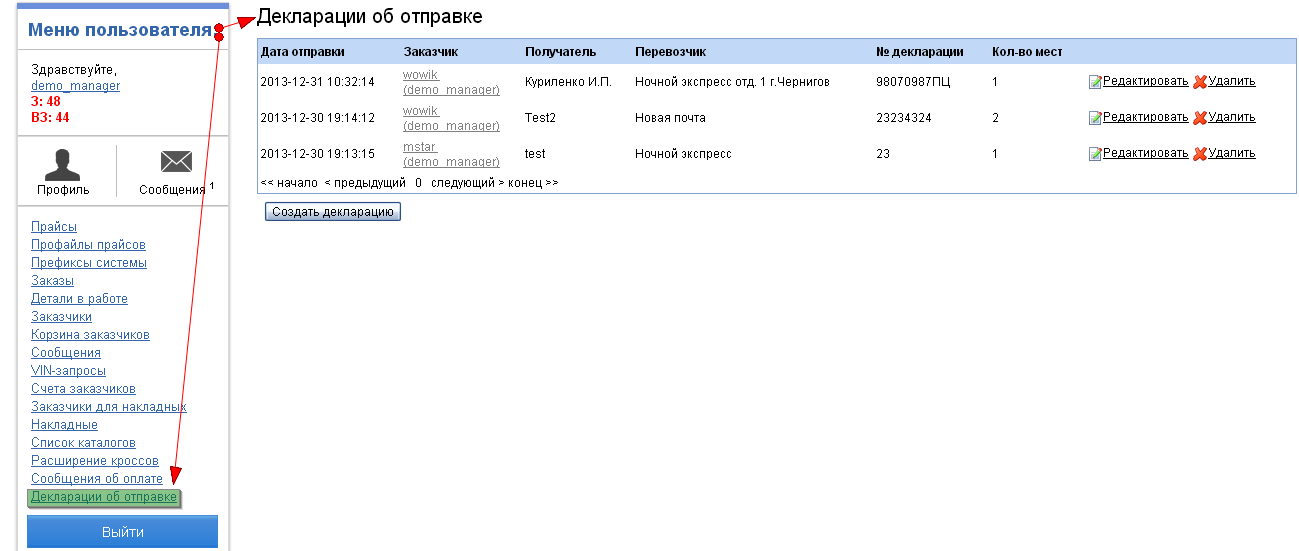
Sending declaration
Declaration about sending
The module provides the ability for site managers to create declaration about goods which was sent to customers site.
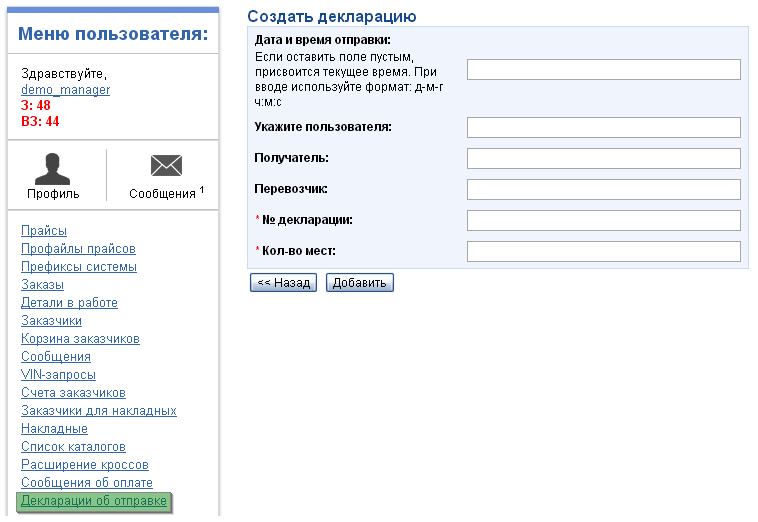
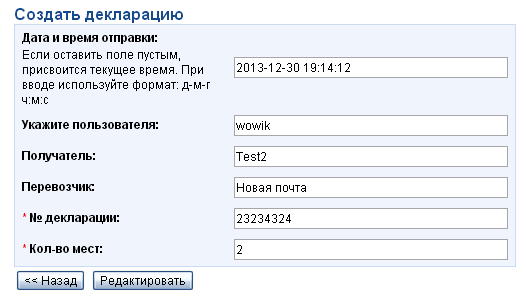
Form of creation the declaration consists of fields:
'The date and time of sending' –need to enter a value such as: day-month-year hours: minutes: seconds, for example: 31-12-2013 20:10:00.
If you leave field empty –it will undertake the current date and time.
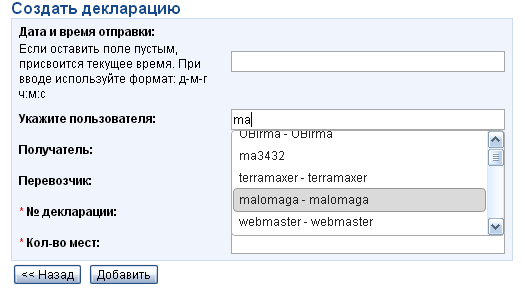
'Login of customer' - this field is with auto-complete, start to type login of customer and site
when finding similar customers give the drop-down list, and You will only have to select the desired item from it.
'Recipient' - recipient data.
'Carrier' - carrier data, city, name, number, perhaps the number of secession and so forth...
'№of Declaration' - required field, you have to specify the number of the declaration
'Number of places' - also mandatory field, enter the number that indicating the number of places of sent goods
Here is the choice of customer:
The declaration can be edited. For this click on the link "Edit" in the list of declarations,
and get to the screen the form with the data of declaration. After making your changes, click "Edit".
In addition to editing, can be done deleting of declaration. Click "Delete" and before removing the module, from will repeat manager for action confirmation.
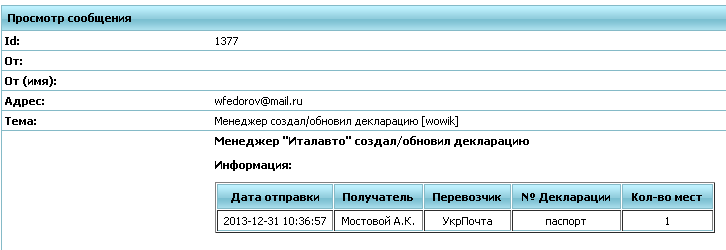
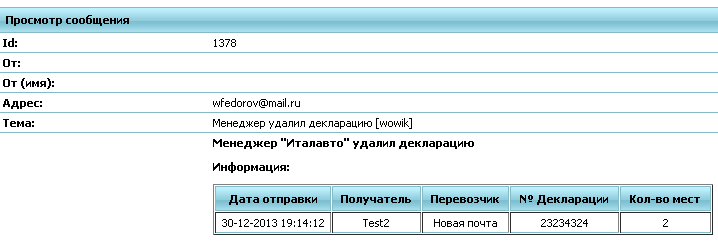
When manager does create, delete, or edit the declaration module will send messages to e-mail of customers. The following are examples of letters:
Email templates are stored in: Empanel - Templates(codes: create_new_payment_declaration, delete_new_payment_declaration)
The administrative part – cms mPanel
mPanel is our own cms developed by company MstarProject, designed for self-management of their website and the customer to minimize handling and, consequently, loss of time to talk "customer-programmer."
mPanel can be found at: http://irbis.mstarproject.com/mpanel/login.php
To receive login/password for authorization one should send request to e-mail mikhail.starovoyt@mstarproject.com.
1) The main site settings are stored in the module "Constants"
mPanel>> Configuration> Constants
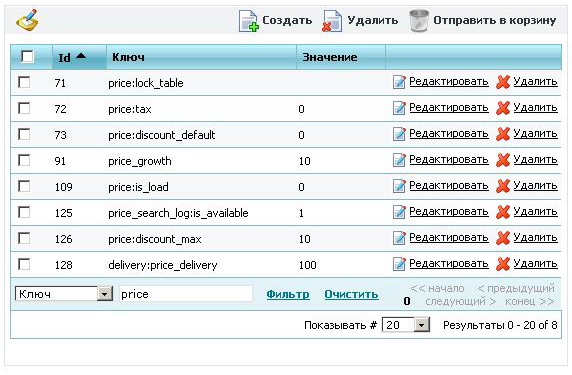
In the lower left corner is the search: drop-down list to select the field (column data), for example, "key" constants and click on "Search" to get the desired list of constants for the module. The programmer writes the key constants for the customer can change it hisself by making the necessary settings to the module.
2) Users of mPanel - Administrators are stored separately from site visitors. Learn more about managing them :
mPanel>> Configuration> Administrators
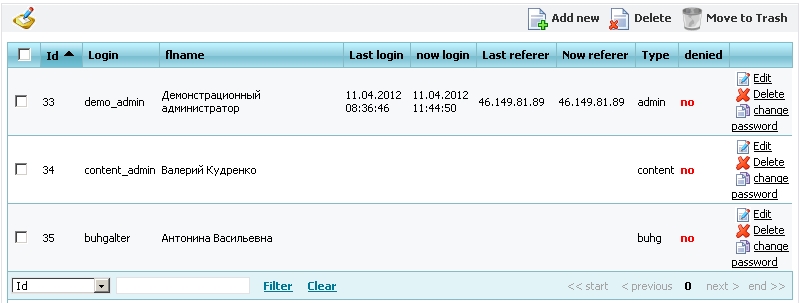
Administrators, as well as other users of the site are closed md5 + salt passwords. The history of visits and activities administrators, as well as other types of users is stored in the database for further analysis, who did what and when. This module:
mPanel>> Logs> Visit log
mPanel>> Logs> Log Admin
The main types of administrators: Accountant, content manager, an admin to give permissions. That is, for each type of admin will have its own set of modules.
Dropdown Manager
3) To work with the pages of the site are 2 modules :< br />

mPanel>> Content> Dropdown Manager
Dropdown Manager - you need to manage site pages: create, edit, delete,
Link to the page with the page mPanel on site is carried out on the field "Code". That is to write text on the page http://en.auto.mstarproject.com/?action=provider need to create a page with the same code ("provider") in the Dropdown Manager.
All pages are represented as a tree of 3 levels. The first two levels are displayed on the front page of the module. The remaining pages third level hidden by clicking on "Browse Items".
A special group of pages of "Additional Pages other_pages", you want to add various special pages that are not displayed in the menu, for example, "User Agreement".
Menus and menu manager customer can expand by adding a page of the "customer menu customer_account" and "Manager Menu manager_account" respectively.
mPanel>> Content> Content Editor
Content Editor - is intended to edit text created in the Dropdown Manager. Also in the Editor page is a file manager to upload pictures, excel, pdf and other files on the server.
You must first select a page to edit from the drop down list of pages that are created in the "Dropdown Manager":
We recommend using only the basic parameters and the markings do not use more, such as "Text Size" or "text color / background." Styles for a site created by a designer can not work together and can interfere with the styles of the editor. As a result, the texts become unrepresentative.
"Source" - a very useful button for advanced users that allows you to check and correct html errors in the manual mode. Online editors are not perfect and often do not generate valid html code with frequent changes of the same blocks. In this mode also works "Saving pages".
In the module "upload pictures" on the server it is better to create the correct file structure so that you can then figure out what and where put into.
To copy text from MS Word and other html editors use the "Paste from Word", which clears the pasted code from the additional tags that can break your page.
After each change, be sure to press the "Submit" button. Even better, all text typing in Notepad or another text editor: often your online work is lost, if only rely on the online editor
4) All other translations are three module "Messages, Text, Templates ". They are essentially the same type but different for other purposes.
For the customer do not ask "Change the button text" or "URGENT! Change the title of tables, forms, fields ..." - Programmer puts the English code, which is edited in the module "Message translate." Your text can be found on the "Contents" in the filter in the bottom left corner.
"Text translate" is different from the "Message Translate" because it is often large html blocks, requiring the editor, not just the text field. If your text is not found in the first two modules - should look into the "Template". This module is described in detail in a separate section of the documentation.
5) The site retains all the important action sequences, while the authors of these acts.
SMS and emails are sent through the queue:
Technical limitations do not allow you to send letters and all created at once, so use the send queue. All advertising is prohibited mailing from our servers - it needs to use third-party software.
In the module "mPanel>> Logs> Financial log" saved critical financial changes and developments, such as a change of discount debt of the customer, the exchange rate and others.
On the other private settings, extensions are descriptions themselves jobs on these modules: the programmer, after completing the
testing the new functionality on the server and puts a description of his work.
Template Manager
The module "templates" by the example of the first document, which receives every new customer - the letter "Confirmation Account" at registration. The code of this template "confirmation_letter": in this unique field to find and edit documents on its website. These defaults are stored in the database as an example of registration of each document and not for use on the production site.
mPanel>> Content> Templates

The logic of such a pattern: the pattern specified object and the object field when editing or creating a template. Corresponding objects taken from the database and the data are substituted into the template. For example, if the template you want to insert the user login - then you need to write just such a structure {$ info.login}, where $ info - object, and login - field of the object. Most often, the objects and fields are available in templates. If some objects or fields is not enough - you need to write a new task of Jira - and the programmer must write down everything in the template objects and their fields.
In each letter, sent to the site server is substituted "Auto signature" - Translation of text with the code "added_no_reply". It is also need to be edited on your site.
mPanel>> Content> Text Translate
As a result, compile time and the data obtained by writing:
In addition to automatically send messages - Templates are also used in the generation of printed forms and documents forming the pages or sections of pages. But the principle is the same everywhere, as well as use the syntax. The site already has a basic set of notification templates and documents that you can modify (without breaking the structure, because the pattern will break). Expand the template the user to set the creation of new jobs in the Giro.
Provider groups
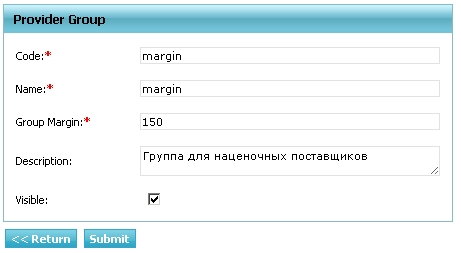
mPanel>> Users> Provider groupsFor each group, you must have a code name and mark
Provider regions
mPanel>> Users> Provider regions
Providers
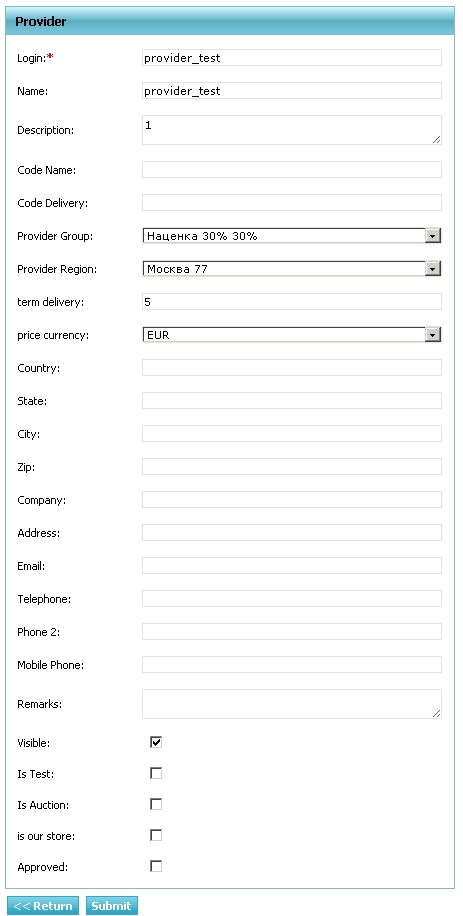
mPanel>> Users> Providers
Username:
Title:
Description: 1
Codename:
Code:
Suppliers Group: Specifies the group of vendors with their premiums
Supplier Region:
Delivery time: Specifies the default amount of time, you will be if no specific delivery time for spare parts
Currency Rates: The currency in which the loaded price of the supplier.
Country:
State (region):
City:
Index:
Company:
Address:
E-Mail:
Phone:
Phone 2:
Mobile phone:
Notes:
Visible: This field is switched off suggestions of the supplier of spare parts search
Test?:
Participates in the auction:
Our Price: Marking a vendor who is a domestic supplier
Confirmed:
Management of currencies
mPanel>> Configuration > Currency

The module allows you to set rates for those currencies that are used in the project.
Currency with id = 1 is the base and all the calculations are stored in a certain currency exchange rate it is 1, all other courses are relative to the base currency. The history of rate changes is stored in mPanel>> Logs> Finance log
Currency rounding
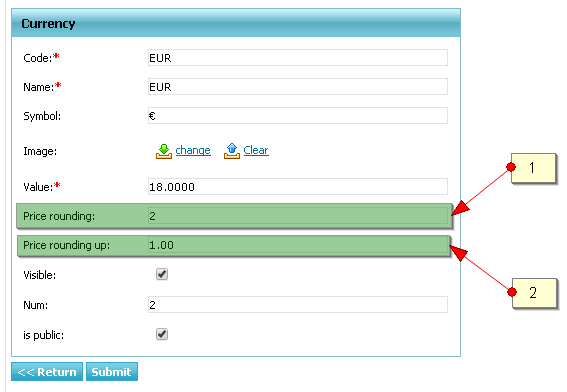
We can set currency rounding on the form of currency edit.
1) Field "Price rounding": responsible for ordinary number rounding. This parameter can be positive, negative and equal 0.
It works only when value of field "Price rounding up " equal 0
Example of work:
Price = 3.4 parameter’s value = 0 Result = 3
Price = 3.5 parameter’s value = 0 Result = 4
Price = 3.6 parameter’s value = 0 Result = 4
Price = 3.6 parameter’s value = 0 Result = 4
Price = 1.95583 parameter’s value = 2 Result = 1.96
Price = 1241757 parameter’s value = -3 Result = 1242000
Price = 5.045 parameter’s value = 2 Result = 5.05
Price = 5.055 parameter’s value = 2 Result = 5.06
2) Field " Price rounding up " it is number rounding up with multiplicity.
Values could be only positive from 0.0х and more (where х any integer), for example: 0.01 or 0.5 or 1 or 150.
Multiplicity is given by number and rounding – by digit:
Value = 1 Multiplicity = 1 Rounding up of 1st digit
Value = 0.01 Multiplicity = 1 Rounding up of 0.01 digit
Value = 100 Multiplicity = 100 Rounding up of 100 digit
Values can be or integer or real less then 1
Values like 1.10 are not allowed
Example of work:
Price = 1353.48 Value of parameter = 0.01 Result= 1353.49
Price = 1353.48 Value of parameter = 0.1 Result = 1353.5
Price = 1353.48 Value of parameter = 0.05 Result = 1353.5
Price = 1353.48 Value of parameter = 0.5 Result = 1353.5
Price = 1353.48 Value of parameter = 1 Result = 1354
Price = 1353.48 Value of parameter = 2 Result = 1354
Price = 1353.48 Value of parameter = 5 Result = 1355
Price = 1353.48 Value of parameter = 10 Result = 1360
Price = 1353.48 Value of parameter = 150 Result = 1500
Price = 1353.48 Value of parameter = 172 Result = 1376
Module of review/removal of prices
In this module possible to review/remove prices loaded on site by loading (price list) of prices of different suppliers [1] Displayed price = price from xls file * coefficient specified in price profile – this price is considerate to be purchase for the system.
Management of details’ groups
This module intended for distribution details to groups in order to form menu and pages of selecting details.
Example of grouping:
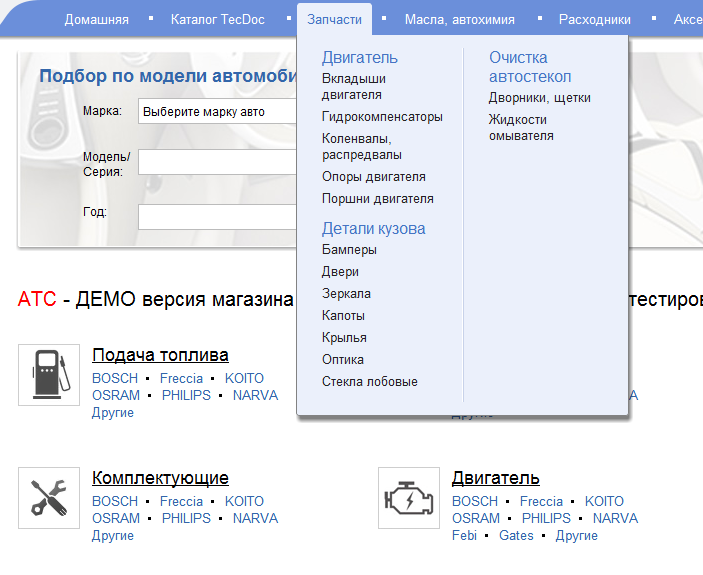 Файл:Auto price group main en.png
Group editing could be implemented in corresponding patrition MPanel:
MPanel>>Car catalog>Detail groups
Groups can construct three-level hierarchies for unification under the general description of the parent group.
According to this, the parent group or groups without children (below lying hierarchy) must be "Level" = 0 and "Parent" = 0 or the group "Level" = 2 have to be as a parent for displaying in the main menu.
For groups of children (below lying hierarchy) have to be "Level" = 1 and "Parent" = ID of the parent group (is selected from the list)
The groups "Level" = 2 should not have the parent ("parent" = 0). They are only needed for merging the groups "Level" = 0 to groups of the main menu and they can’t display the details. Also they do not have references to them self in the main menu.
In groups without children (below lying hierarchy) do not shown "own" details, only the details of children groups!
These groups are designed only for combining the children groups!
</ pre>

The page for creation and editing of group looks as follows: <br />

[[File: Auto_price_group_edit2.png]]

# '' '' Code '' '' - code (number) of group which have to be specified in the file of  loaded price for distribution the details by the groups. <br />

# '' '"Code name"' '' - the name by which the links to the groups will be formed. Only Latin and the underscore symbol "_" allowed <br />
# '' '' Name '' '' - the name of the group is displayed in list x, legend etc. Cyrillic is allowed. <br />
# '' '' Level '' '' - group level in the hierarchy. <br />
# '' '"Parent group"' '' - the identifier of the parent group. <br />
# '' '' Title '' '' - the title is displayed in the browser window. <br />
# '' '' Description of the page '' '' - the description of the group for the search engines. <br />
# '' '' Keywords '' '' - the keywords for search engines. <br />
# '' '' Description '' '' – the main description of the group which is displayed till the list details. <br />
#'' '' Description at the bottom of the page'' '' - this description is displayed after the list details. <br />
#'' '' Displaysdetails'' '' – specifies whether to display the list details in the group. This condition is not valid for groups of the level 0 which have children ((below lying hierarchy) because they can’t have the list details<br />
#'' '' Picture'' '' - the image is displayed on the home (main) page
#'' '' Menu '' '' - sets the displaying in the main menu
#'' '' On the main'' '' - sets the displaying on the main page
#'' '' Visible '' '' - enables the visibility of the group<br />


==== Reference the goods to the groups of details using associations====

When loading the details can get into the groups, using the field[[# Loader of prices for different suppliers| ID_PRICE_GROUP]]the prices, when the site manager in the uploading price list creates a column with codes of groups and for each detail puts group code. But there is another option.

In Empanel –Catalog of auto– Group details is added a field  "Association" when editing group. This field allows to check for conformity to the group of details when loading each position of the price.

A simple example:
The name in the price "Fuel filter Bosch" – for assigning this position to the group "Fuel filters" in the field of association must be inserted such variants-Fuel filter, fuel filter
- The register does not play any role in the variants.
-All variants should be shared with each other by symbol ';'(semicolon).

[[File: AT-3.png]]

Checking mechanism of belonging to the group of details can be used on price list loading  in case of setting flag in the profile of price, which will be used for uploading,-Use the associations to bind the groups:<br>
[[File: AT-2.png]] <br><br>


After loading the price you can see at what positions were putted down the groups and on which does not: <br>
[[File: AT-1.png]]


=== Prefixes management of the group details ===

Prefixes of details groups involved in the filter by brand on groups pages[1]. They created automatically when price loading.
When transferring the details into another group or removing details, may arise a situation when on the group page presents brand filter, and there are no details in it. To resolve this situation exists ability to edit, create and delete prefixes of groups. <br>

[[File: Auto_price_group_pref_brand.png]] <br>

<pre>EmPanel>> Catalog Auto> Prefixes of group details </ pre>

For a complete re-creation of prefixes exists a button "Rebuild the linking of prefixes and groups" which in automatically mode creates the prefixes for all groups by all loaded details into the system.

[[File:Auto_price_group_pref.png]]

Editing of groups prefixes looks as follows:

[[File:Auto_price_group_pref_edit.png]]

"ID of group" - indicates onthe group ID which is displayed in the "EmPanel>>Catalogue of cars >Group of details" <br>
"Pref" –the prefix of directory which is specified in the "EmPanel>>Catalogue of cars > List of directories" <br>
"Visible" - indicates on prefixof the group visibility in the system <br>


== Hidden (nonvisual) and system modules ==

=== User Discounts ===
Discounts use the default formula for the sum of: the time taken for determining the price the sum of the three reductions. Such discounts are available, such as: static, dynamic and group. As a result, the discount can be negative - that is to be in effect for the mark-up price lists of suppliers, who have not specified the purchase, and the retail price. If you change the constant discount: type = max, then the discount will be considered by the formula maximum discount of all available discounts and negative can not be in such a scheme. <br Clear="all" />
The total discount can not be greater than the constant "price: discount_max", whose value is the default 10%. That is, if the customer is exposed discount greater than 10%, then the module "online price" will be used in a 10% discount. To cancel the discount - you can set the value of this constant to 0.

Also when calculating the discount can happen that calculated price will be lower purchase price (specified in the database). Therefore, check up exists in calculating prices formula for this situation, and stipulated a minimum margin. The minimum margin specified in constant "price: margin_min" and default value is 1. For example, when you set up this constant for equal 1.05,it will be considered the minimum margin = 5%. That is, if during price calculation the customer margin will be less than 5%, then the price will be displayed with a 5% surcharge.

Below is a module, which sets group discounts to users. That is, discount assigned groups and users to define their own groups. If you change the discount group - a group discount, respectively, will change for all users in this group.
<pre> mPanel>> Users> Group customers
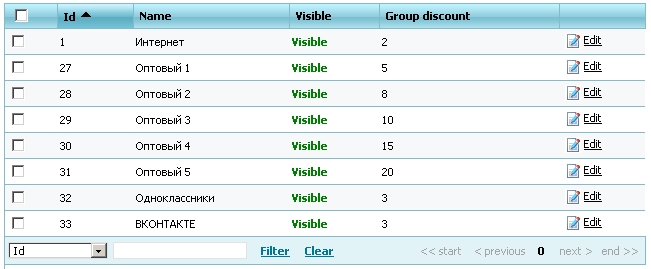
The group with ID = 1 is assigned to registered users by default, and if this group is off, all registered users, in contrast to the guest order will be cheaper to buy a product the size of this discount.
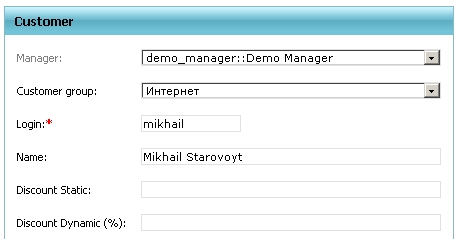
Static discount assigned to the customer personally and do not change with time, it is edited in a module
mPanel>> Customers> Customers
Dynamic discount is calculated from the turnover of money per month (30 days - constant in mPanel "discount: dynamic_discount_period_day"). Themselves are dynamic discount for speed set in the module
mPanel>> Users> Dynamic discount

From this table, if the user has 30 days money was supplemented by more than 25 000 conventional units of base currency - he will be assigned dynamically in a 4% discount if more than 50 000 - 5%. Dynamic discounts are recalculated once daily at night for all buyers.
Data Archiving
At night time, when the server has minimum loading, mysql database dump of the site creates on the same server where the site is located. Also dumps shifted to another server for case if the hard drive fails or server computer breaks. Dumps save for the last 7 days and dumps older 7 days will be deleted.
Explanation for using constants
EmPanel>>Settings>Constants
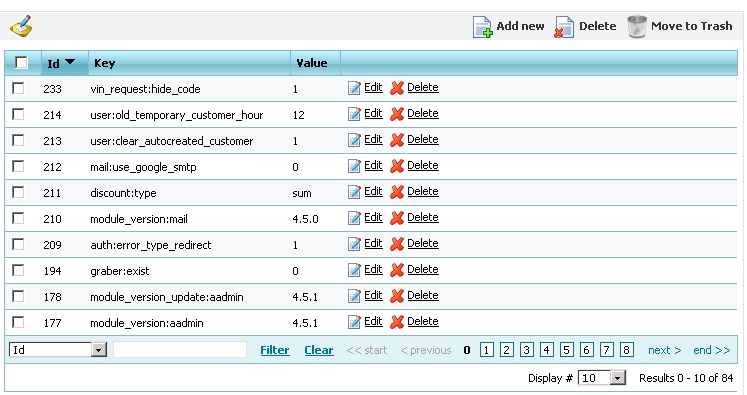
In the bottom left corner there is search area: in drop-down list need to choose the desired field (column data), for example the "key" of constant and click on the link "Filter" to get the desired list of constants modulo. The programmer writes key of constant in task so customer could change it by himself, making the desired settings in the module working.
